
Box with Acetate Window
Supplies –
1 x piece cardstock - 6 ¼” x 6 ¼” square
1 x piece DSP – 4 5/8” x 4 5/8” square
Scallop Circle Punch
1 3/8” Circle Punch
1 ¼” Circle Punch
Bone Folder
Sticky Strip
Dimensionals
Paper Cutter
Scissors
Box
1 Score the 6 ¼” x 6 ¼” square cardstock at 2” & 4 ¼”
2 Rotate & repeat

3 Using your scissors, cut along 2 score lines on opposite sides of the cardstock
4 Trim ½” off top of the 4 outer squares
5 Cut a “V” into the inside corner of each of the pieces & again for the outside

6 Using Sticky Strip and with the right side facing you, adhere the sides to the inside of box

Lid
1. Score the 4 5/8” x 4 5/8” square cardstock at 1” all around the lid
2. Rotate & repeat

3. Using your scissors, cut along 2 score lines on opposite sides of the cardstock
4. Trim ½” off top of the 4 outer squares
5. Cut a “V” into the inside corner of each of the pieces & again for the outside

6. Using 1 ¼´Circle Punch, punch the middle out of the top of the lid


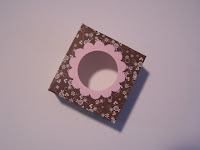

7. With a scrap piece of cardstock, and using 1 ¼” Circle Punch, punch out a circle
8. Using the 1 3/8" circle punch, punch out a piece of acetate
9. Using the Scallop Punch, place over the circle, ensuring that it is even all around, punch
10. Adhere the acetate to the wrong side of the scallop piece
11. Adhere scallop piece over the top of the circle
12. Using Sticky Strip and with the right side facing you, adhere the sides to the inside of box
13. Place lid over the bottom & embellish
I hope you enjoy this tutorial. It is the 1st one I have completed with photos, as I didn't know if I could make myself clear enough without them.
If anyone has any problems understanding, please do not hesitate to contact me
Until tmw, when I will do one for the card!
Vicky
No comments:
Post a Comment