Showing posts with label Tutorial. Show all posts

Saturday, 23 June 2012

Butterfly Tutorial...

Thank you to everyone who emailed me in regard to the butterfly card we created at our Friday Crafty Creations Class.  I was really quite taken, especially with the lovely comments & the many requests for the template.

Along with the template, I've now included instructions on how to create your butterfly.  A big thanks must go out to Naomi who has so kindly shared her mum's template.

The original post may be seen here which gives you all my measurements for the card & supplies used in creating this card.

The Tutorial will remain permanent on my blog under the Page "Free Tutorials"

Accordian or Concertina Butterfly Tutorial

When you have created your butterfly, I would really love to see them.

Happy Creating!

Friday, 23 March 2012

Happy Easter...

Envelope & Inside of Card...
We created an Easter Card today at the Caloundra Community Centre.  Always a relief to hear that the ladies loved it!  Along with the card, we included the Techniques of Scoring & Chalking, plus a little bit of punching & we have a really lovely Easter card!  Will be the first to admit it is not your normal traditional card, but I love the Cabuary's Purple & I built the card around that colour!!!!!

Measurements -
Base Card - Concord Crush - 11 3/4" x 4 1/8" or 29.5cm x 10.5cm - Scored in middle & folded in half
Layer 1 - Whisper White - 5 3/4" x 3 7/8" or 14cm x 10cm
Layer 2 - Melon Mambo - 5 5/8" x 3 3/4" or 13.5cm x 9.5cm
Layer 3 - Whisper White - 3 3/4" x 3" or 9.5cm x 8cm
Layer 4 - Concord Crush - 3" x 2" or 8cm x 5cm
Layer 5 - Whisper White - 2 7/8" x 1 7/8" or 7.5cm x 4.5cm

I layered the piece of Melon Mambo to Whisper White & then to the Base Card using Snail Adhesive.

With the medium piece of Whisper White, I scored at /1/2" intervals diagonally & then diagonally the other using the Simply Scored Scoring Tool - out in the new Mini 1st April.  I then grabed a couple of SU! Sponges, my Stampin' Pastels & randomly chalked the whole area using 3 or 4 colours.  I added a little bit of Daffodil Delight to lift it a little & to bring the colours out.  I didn't really bother to fill all the white spaces, as I have left some here & there to give a little bit more of an effect!

I punched a border along both sides of the chalked piece with my Scallop Trim Border Punch.
I adhered a piece of Ribbon along the middle, tucked ends under, tied a knot & adhered to the Base Card with Snail Adhesive.

I stamped the Bunny image onto the smallest piece of Whisper White using Poppy Parade Ink & adhered to the piece of Concord Crush Cardstock.  This piece was adhered to the top of the card using Stampin' Dimensionals.

I typed the greeting onto a piece of Whisper White Cardstock, punched out with my Modern Label Punch.  I punched a 2nd piece in Concord Crush Cardstock & cut in 2.  I adhered this 2nd piece to the Whisper White so that just the ends of the Concord Crush were showing. 4 Pearls, 2 each end were adhered to the greeting.

I adhered 3 Pearls to the top LH corner of the image, 3 small Pearls along the bunny's neck while another was adhered tot the centre of the flower & adhered to her neck.  I punched this small flower using the Flower Punch from the Itty Bitty Punch Set in Melon Mambo Cardstock.


Supplies -
Stamp Set - Chocolate Bunny
Ink - Poppy Parade
Cardstock - Whisper White, Concord Crush, Melon Mambo
Ribbon - 1/2" Stitched-Poly - Concord Crush
Punches - Modern Label, Scallop Trim Border
Accessories - Snail Adhesive, Stampin' Dimensionals,
Bone Folder, Pearls, Stampin' Pastels, SU! Sponges
I will be posting another card made using the same supplies, etc in a couple of days, except it is a different shape & it was created prior to this one.
Until next time, Enjoy!

Friday, 28 October 2011

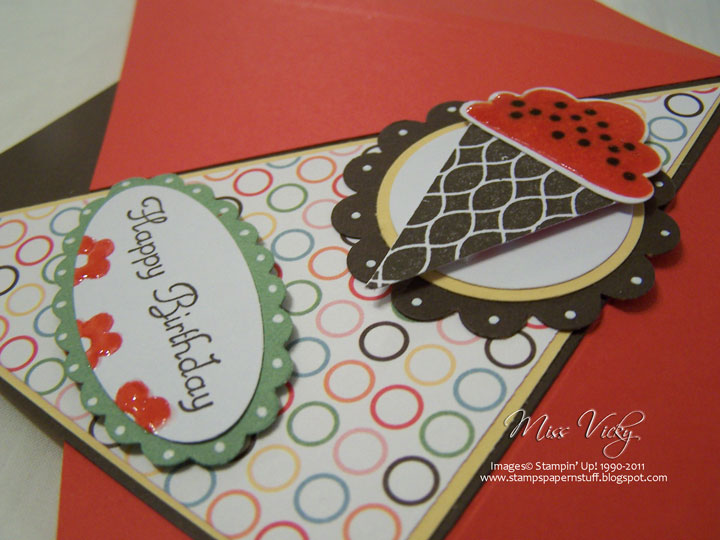
Pyramid Card Tutorial...

After receiving a number of emails from different stampers asking for the measurements for the Pyramid card I created Here I have finally finished them.  I only hope they make sense & you are able to understand.

In fact I created another card very similar to the one linked above.  The measurements have been made to fit an Australian Standard Envelope.

Please excuse the photos as they were taken at night when the light was not the best!
 
Supplies –

Stamp Set – Create a Cupcake, Pennant Parade
Ink – Early Expresso, Poppy Parade
Cardstock – Early Expresso, Whisper White, So Saffron, Poppy Parade
DSP – Just Add Cake
Punches – Cupcake Builder, Petite Pennants Builder, Scallop Oval,
Large Oval, Scallop Circle, 1 3/8” Circle, 1 ¼” Circle
Accessories – Snail Adhesive, SU Dimensionals, Crystal Effects

Measurements -
2 x Poppy Parade Cardstock – 4 ¼” x 4 ¼” or 11cm x 11cm
1 x Early Expresso Cardstock – 4 ¼” x 4 ¼” or 11cm x 11cm
1 x So Saffron – 4 1/8” x 4 1/8” or 10.5cm x 10.5cm – cut in half from point to point – gives you 2 triangles - you will only require 1 triangle, save the 2nd for another card
1 x DSP – 4” x 4” 0r 10cm x 10cm - cut in half from point to point – gives you 2 triangles - you will only require 1 triangle, save the 2nd for another card
1 x Whisper White Cardstock – 8” x 4 1/8” or 20.5cm x 10.5cm

Directions –
Front –
1. Score & fold each piece of Poppy Parade & Early Expresso Cardstocks in half from corner to corner – creates a triangle
2. Unfold

3. Place 2 pieces - Poppy Parade - side by side so that the fold begins from the centre – where the 2 cards meet – out towards the lower outside edges
4. Place the 3rd piece – Early Expresso – so that the fold runs along the join of the 2 pieces of Poppy Parade

5. Adhere Early Expresso Cardstock so that the right side is over the square on the right & the left side is under the square on the left
6. Take 1 triangle of So Saffron Cardstock & adhere to Early Expresso Cardstock
7. Take 1 triangle of DSP & adhere to So Saffron Cardstock


8. Embellish & complete front of card


Inside –
9. Taking the piece of Whisper White Cardstock, score down the middle
10. With a pencil, draw a line from the top centre score to the bottom of the corner – both sides


11. Cut along both these lines – you will have a triangle


12. Erase pencil lines – if any
13. Decorate & embellish inside card
14. Adhere to inside of card using Snail Adhesive


15. Apply 3 SU Dimensionals to the inside of card – this allows you to open & close your card


Congratulations, you have completed your Pyramid Card!

Please feel free to email me if you do not understand any part of the tutorial.

Until next time, Enjoy!

Sunday, 12 June 2011

An Old Favourite...

It has been some time since I've used one of my favourite stamps - 5th Avenue Floral.  With some stamps, it doesn't seem to matter how you use them you are guaranteed that your card will always come up "roses" - so to speak.

I've never attempted a "Step Card" before & as usual I didn't go by any instructions to make mine, although there are heaps of instructions & tutorials out in blog land for you to follow.  I also made mine to fit our standard envelope in Australia.  As I really enjoyed making this type of card, I don't think it will be my last.

Cut A4 Cardstock - Bashful Blue - 11 3/4" x 4 1/4" or 29.5cm x 15cm
Back section of card for your greeting or note...
Score & fold from bottom along the longer side at 1", 2", 4", 6" & 10 1/4" or 2.5cm, 5cm, 10cm, 15cm & 26cm
Cut Bashful Blue Cardstock 5 7/8" x 4 1/4" or 15cm x 10.5cm
Adhere to back section of card - will give you a section for your card to fold out & stand
Cut 2 pieces of Wild Wasabi Cardstock - 5 3/4" x 4" or 14.5cm x 10cm & adhere 1 piece to the above section of card
Cut 2 pieces of Whisper White Cardstock 5 5/8" x 3 7/8" x 14cm x 9.5cm - stamp image onto 1 piece of card & adhere to Wild Wasabi
This section is the part you are able to write your greeting onto ie the inside of a normal card

Back Section -
I randomly stamped my images onto the 2nd piece of Whisper White Cardstock using Wild Wasabi, Bashful Blue & Crumb Cake Inks.  After dying my Whisper White Taffeta Ribbon with Crumb Cake Re-Inker & allowing to dry, I adhered this across the top half of the Whisper White Cardstock, adhered to Wild Wasabi & then to the Base Card.  I tied a bow & adhered this to the card too.

Middle Section -
I stamped the wording using Crumb Cake Ink onto Whisper White Cardstock, cut it out & adhered to Wild Wasabi, which was then adhered to the middle section.  I allowed a little bit of the wording sit above the fold, instead of flat against the card.  I made 2 flowers using retired Felt Flowers, small white flower which I dyed using Bashful Blue Re-Inker & a Silver Brad.  These were attached to the centre section of the card.

Front Section -
I cut a small piece of Wild Wasabi Cardstock & adhered to the Bashful Blue.  Using the Scallop Oval Punch & Crumb Cake Cardstock, I punched a piece of Whisper White which I had stamped the sentiment using Wild Wasabi Ink, & adhered to the Scallop punched piece.  I used the Large Oval Punch for the Whisper White.  I again dyed 3 small white flowers using the Bashful Blue Re-Inker, applied a silver brad in each & adhered to the card.

I've used a couple of retired products making this card, but they are able to be substituted for current products.  The flowers come from a big box of misc flowers - pre-SU - I have & dye from time to time so that I am able to use them up.

Supplies -
Stamp Set - 5th Avenue Floral, Oval All
Inks - Bashful Blue, Wild Wasabi, Crumb Cake
Re-Inkers - Bashful Blue, Crumb Cake
Cardstock - Whisper White, Wild Wasabi, Bashful Blue
Punches - Scallop Oval, Large Oval
Ribbon - 3/8" Taffeta Ribbon - Whisper White
Accessories - Multipurpose Glue, Silver Brads, Felt Flowers - Old Olive
Non-SU - Small White Flowers

Until next time, Enjoy!


Wednesday, 18 May 2011

Accordion Card...

The person I have made this for doesn't like bling, busy, but just simple & plain, so this is what I come up with.

These cards have been around for sometime, but as usual I didn't chase any instructions to make mine.  Instead, I did mine to suit the Aust standard envelopes.  To ensure it still fitted into the envelope, I didn't want to put too much onto the card & bulk it up.

It is my first time at making an "Accordion Card", so hopefully you will be able to understand my instructions.  I've discovered they are very easy to make & a lot of fun embellishing.

Front -
I adhered Real Red Cardstock to the Base Card, applied DSP to the bottom, stamped the image directly onto Very Vanilla Cardstock using my SU Markers.  I then adhered this piece to Daffodil Delight Cardstock before adhering to the base.

Inside 1 -
Left Hand Side - I adhered DSP to Pear Pizzazz Cardstock & stuck this to the base card.  I then stamped the greeting using Real Red Ink onto Very Vanilla Cardstok, adhered it to Chocolate Chip Cardstock & then to the DSP.

Right Hand Side - Prior to adhering the 2 base cards together, I cut an oval out of the Chocolate Chip Cardstock, stamped the image onto Very Vanilla Cardstock using my SU Markers.  I cut a smaller oval of Real Red Cardstock & adhered it to the back of the Chocolate Chip.  I then adhered the Very Vanilla Cardstock to the back of the Real Red Cardstock.  The whole lot was then adhered to the smaller card to form the accordion.  I applied a Basic Pearl to the centre of the flower.  When adhering, ensure that you have your Valley, Fold, Valley.

I punched 4 corners using my Corner Punch - 2 in DSP & 2 in Very Vanilla Cardstock.  These were adhered to the card as per photo.

Inside 2 -
Left Hand Side - I cut a piece of DSP & adhered it to the base card.  Very easy as I didn't want anything else on this.  I will type & print a verse out to adhere here prior to posting.

Right Hand Side - I punched 2 corners using the Corner Punch - 1 in DSP & 1 in Chocolate Chip Cardstock.  These were adhered to Very Vanilla Cardstock which had been adhered to the Chocolate Chip base.  I punched a strip of Real Red with Border Punch and a strip of DSP using the same punch.  These were adhered to the bottom of the Very Vanilla Cardstock.  I stamped the 3 flower images directly onto the Very Vanilla Cardstock using Real Red Ink.  I applied 3 Basic Peals to the centre of the flowers.

Once folded, I adhered a piece of ribbon to the front, ensuring it wrapped around the whole card & tied a bow at the front.


Supplies -
Stamp Set - Friends Never Fade, Blessed Mother
Ink - Real Red
Cardstock - Chocolate Chip, Pear Pizzazz, Daffodil Delight, Very Vanilla
Punches - Corner Punch, Eyelet Border
Ribbon - 1/2" Stitched-Poly - Pear Pizzazz
Accessories - SU Markers, Basic Pearls, Multipurpose Glue, Snail Adhesive

Instructions -
Card 1 - Chocolate Chip Cardstock - 3" x 4 1/8" or 9cm x 15cm - Score in middle & fold
Card 2 - Chocolate Chip Cardstock - 10.5" x 4 1/8" or 27cm x 15cm - Score @ 3 1/2" x twice or 9cm twice
Adhere Card 1 to Card 2 ensuring that you have a Valley, Fold, Valley
Embellish card to complete

Until next time, Enjoy!

Sunday, 17 April 2011

Masking Tutorial...

I've finally managed to write the Tutorial for Masking.

  1. Stamp image onto card stock
  2. Stamp the same image onto a scrap piece of paper & cut out, careful to cut just inside the lines - this will be your mask
  3. Place the mask on top of your image on your card
  4. Stamp a different image over a portion of the mask - this creates layered images
  5. Remove mask
  6. Embellish card
Tip -

If you do not have a Post-It Note to stamp your image onto, use snail glue to create a temporary adhesive to the back of mask and then stick this to a towel once or twice.  It will remove the sticky adhesive, but at the same time, leave enough adheseive so that you are able to place your mask on your card.

I sometimes store this mask in with the stamp set so that it is ready to be used again


Please do not hesitate to contact me if you have any questions or not sure of anything
 
Until next time, Enjoy! 


Monday, 3 January 2011

Clipboard...

For something a little different, I thought I would post a Clipboard I did the other day.  This board now sits by my phone & comes very handy for those messages & dates.

I had all intensions of using it as a clipboard, but once I had printed the calendars & found spare Post-It Notes, that idea went out the window.

Clipboard -
Cut 2 pieces of DSP - Lap of Luxury, one for top of Clipboard & the other for the bottom
Adhere both pieces to Clipboard
Cut a strip of Concord Crush Cardstock & using your Scallop Trim Border, punch both sides of strip
Adhere strip of Basic Gray to the top of Concord Crush
Adhere to DSP where top & bottom join - this covers the join
Apply row of pale pink pearls along middle of strip
Calendar -
Print 2011 calendar & punch holes in the top LHS & RHS
Push flower brads - Pretty in Pink - through both holes
Adhere to square piece of Concord Crush Cardstock
Adhere calendar to top RHS of Clipboard
Post-It Notes -
Using Concord Crush Ink, stamp sentiment/greeting on all Post-It Pages
Cut piece of Concord Crush Cardstock & adhere Post-It Notes
Adhere to middle of Clipboard
Bulldog Clips -
Cut small pieces of DSP & adhere to Clips - 3
Cut small piece of Ribbon - Pretty-in-Pink & tie to clip
Adhere rhinestones - purple & pearls - pink
Clip onto Clipboard
Clip -
Tie ribbon to top of clip - Concord Crush & Pretty-in-Pink - 3 pieces
Pen -
Cut small piece of DSP
Take middle of pen out & insert DSP
Tie small piece of Ribbon - Pretty-in-Pink - around the top

Finished.  Your clipboard is now ready to sit in your office, beside the phone or on the kitchen bench, ready for those messages!

Supplies -
Stamp Set - Great Friend
Ink - Concord Crush
Cardstock - Basic Gray, Concord Crush
DSP - Lap of Luxury
Punches - Scallop Trim Border
Ribbon - 1/4" Grosgrain - Pretty in Pink, 1/2" Stitched-Poly - Concord Crush
Accessories - Multipurpose Liquid Glue, Flower Brads
Non-SU - Rhinestones, Pearls, Post-It Notes, Calendar, Pen, Bulldog Clip, Clipboard

Enjoy!

Tuesday, 23 November 2010

SU Pastels...

This is a tutorial I used when I created the card here

SU Pastels

Supplies -
  • SU Pastels
  • Sponge Daubers
  • Tissues
  • Neutral Cardstock - Very Vanilla
 Instructions -
  1. Using a Dauber, select lightest colour pastel - Certainly Celery
  2. Daub onto card, repeating as necessary to cover desired area of cardstock
  3. Using tissue, blend
  4. Using darker colour - Always Artichoke, apply over the lighter colour previously used
  5. Using tissue, blend
  6. With 2nd Dauber and Bashful Blue, repeat Steps 1-3
  7. Using darker colour - Not Quiet Navy, repeat Steps 4-5
  8. Repeat above Steps 1-7 until such time as you have desired effect
  9. Remove circle
  10. Complete and Embellish card
Moon -
  1. Punch circle using 1 1/4" Circle punch
  2. Apply small daub of adhesive to back of circle - not too sticky
  3. Position circle and adhere to neutral cardstock
  4. Complete instructions as per SU Pastels
 Tip - A Post-It Note is best to use here

Until next time, Enjoy!


Tuesday, 6 July 2010

Sponged Clouds...

I am not sure how everyone else does their clouds, but please find below a very short Tutorial for the Technique "Sponged Clouds" - the way I did mine!

Supplies -
Cardstock - Whisper White
Post-It Notes or Scrap Paper
Ink Pad - Baja Breeze
Sponge or Dauber

Instructions -
  1. Freehand draw clouds onto Post-It Notes or a scrap of paper - you will need about 5
  2. Cut clouds out & apply non-permanent adhesive to back of mask
  3. Apply to Whisper White Cardstock where you would like your clouds to appear
  4. Using Sponge or Dauber, begin sponging ink over cardstock & masks
  5. Continue sponging over entire cardstock
  6. Peel masks off carefully
  7. Complete card & Embellish
Enjoy!

Wednesday, 5 May 2010

G'Day Stampers,


I am a little behind on my postings, so please bear with me while I catch up a little, well try to anyhow.


Today, I am posting a Tutorial on how I did the flower for this Card 


There are probably heaps of tutorials on how to do this flower, but this is the way I did mine.


If you have any hassles or problems understanding, please do not hesitate to contact me.
  
Scallop Circle Flower

 Supplies -
  • Scallop Circle Punch
  • Cardstock
  • Ink
  • Brads/Buttons
  • Spritzer Spray bOttle
  • Handheld 1/16" Punch
  • Sponge/Sponge Dauber
Instructions -
  1. Using Scallop Circle Punch, punch 5 circles
  2. Using Sponge or Sponge Dauber, daub ink around edges of circles
  3. Apply ink a little darker to the middle of top circle
  4. Place on top of each other &using handheld PUnch, punch though centre of all 5 circles
  5. Attach Brad/Button through centre
  6. Using Spritzer Spray Bottle, spray lightly over circles, until just damp
  7. Very gently, scrunch circles, one layer at a time
  8. Let dry
  9. Once dry, attach to card
Hope you enjoy this tutorial & more importanly enjoy creating these lovely flowers......

Until next time, Enjoy!

Saturday, 24 April 2010

Crayon Resist...

After a couple of requests on how to do this Technique, please find below a short tutorial.  This is a very basic tutorial, as I find this is easiest to understand both for myself and class.

Supplies -
  • Cardstock - White Glossy
  • Ink - StazOn
  • Stamp Set - Seaside
  • SU Woder Crayons
  • Sponge/Brayer
  • Tissues
 Instructions -
  1.  Stamp image/s onto glossy cardstock using Basic Black or Staz-On Stamp Pad
  2. Allow to dry
  3. Using a white or light coloured Wax Crayon, colour in or highlight any areas you wish to remain white
  4. Sponge or brayer ink over the stamped images, using multiple or single colours
  5. Once dry, buff off using a tissue
  6. Embellish card


Wednesday, 7 April 2010

Always...

G'Day Stampers,

This is one of the cards we did in our Technique class today - "Rock n Roll" - Tutorial below....

The colours - YoYo Yellow - is way out of my comfort zone, but hey you have to try these colours & surprise, surprise, I quiet like the end result!

Again, I've not stampes a greeting.  This way, you can either include a greeting just prior to posting or leave blank.

Closed -

Open -

Supplies -
Stamp Set - Always
Ink - YoYo Yellow, Chocolate Chip
Cardstock - Whisper White, YoYo Yellow, Chocolate Chip
DSP - Chocolate Chip
Punches - Eyelet Border
Accessories - Snail Adhesive, Glue-Dots
Non-SU - Rhinestones

Instructions –

1. Stamp image onto light-coloured ink pad

2. Press edges of stamp in a rolling motion onto darker ink pad, being careful not to ink the centre of the stamp


Tip -
Always use the lightest coloured ink first to avoid getting dark ink on your light ink pad
Until next time, Enjoy!

Friday, 2 April 2010

Brayering - Basic

G'Day Stampers,

I have a small wee Tutorial/Technique to share with you today

Brayering - Basic

Supplies -
Ink
Cardstock
Brayer
Stamp Set
Scrap Paper

Instructions -

  1. Ink Brayer with ink, ensuring you roll in one direction, usually away from you

  2. If required, repeat until roller is fully inked

  3. Ensuring scrap paper is under your cardstock, roll Brayer onto your card

  4. Decorate & complete Card
Tip -

  • Do not roll Brayer back & forth on ink pad, as you will be only inkin 1/4 of your surface

  • Scrap paper is required as you will be rolling off both ends/sides of your cardstock
Very easy simple technique!

Until next time, have a practice

Enjoy

Thursday, 11 February 2010

Wedding Card....

Hi Stampers,


As I've just completed an Invitation Package & as part of my "Thank You" to my Customers, I design a Congratulations card.  I usually make the cards in the colours of their invitations and very similar to their designs, etc. 
I knew I wanted to use Stampin' Up!'s "Always" Stamp Set, and am very happy with the outcome.
View # 1 -
Close Up -
Supplies -
Stamp Set - Always
Ink - Chocolate Chip, Versamark
Card Stock - Chocolate Chip
Punches - 1 1/4" Circle
Accessories - Anywhere Glue, Heat Gun, Embossing Powder - Clear, 
Taffetta Ribbon - Very Vanilla, SU Dimensionals
Non-SU - Cardstock - Pearl

To emboss this card -
1.    Rub Stampin' Buddy over cardstock
2.    Stamp image with Versamark, then stamp image using Chocolate Chip
3.    Stamp image onto cardstock
4.    Using heat gun, heat image until colour changes
5.    Adhere to Card
6.    Embellish Card

Tip - There is no need to purchase a heap of embossing powders in all colours, Stampin' Up's Versamark & their great embossing powders of Gold, Silver, Black, White & Clear is all you will ever require! 
The results show & speak for themselves & are out of this world!

Why not have a go! 
If you have any queries, please do not hesitate to contact me as I am only too happy to help you out!
Enjoy
Vicky

Monday, 4 January 2010

Challenge - C4C18

Let's have some fun!  Polka Dots Fun!

This is the weekly Challenge set by Crazy 4 Challenges!

Design a card/project using Polka Dots. 

My take of it is below.  See below for the link to their website, more details & samples.


Supplies -
Cardstock - Whisper White
DSP - Patterns DSP - Pink Pirouette
Punches - Scallop Edge, Scallop Circle, 1 1/4" Circle
Accessories - Snail Adhesive, Ribbon, Pencil & Rubber, Uni-Ball Gel Pen

 I saw this in a magazine a long time ago & it has always been at the back of my mind.  I have never seen one on the internet or if there is, I have not come across one before.  I've made a simple tutorial if you are interested in trying one.

Tutorial for Baby Dress -
Instructions –

Dress -
1. Cut Whisper White Cardstock – 4” x 6 “
2. Score card in half
3. Measure halfway along fold
4. Using 1 ¼” Circle Punch, punch small ½ circle for neck
5. Measure down 1 ½” from top of card
6. Measure in ½” from edge, cut – sleeves
7. Repeat Steps 6 & 7 for other side
8. Using a pencil, rule a line starting from where the cut finishes to the bottom of outside of card
There should now be a small slant running down the length of the card
9. Using scissors, cut from bottom to the top – where the cut for the sleeve finishes
10. Repeat Steps 8 & 9 for other side
11. Will now start to look like the shape of a dress
12. Erase pencil lines

Overlay –
1. Cut DSP 4” x 6”
2. Starting from underneath the sleeves, match up against Cardstock, rule shape & cut -
3. Top will be small than bottom
4. Using Scallop Edge, punch hemline – Hem should be about ½” shorter than Card
5. Apply adhesive on DSP & adhere to Card in line with the sleeves
6. Attach matching Ribbon & tie bow
7. Cut small pocket from DSP
8. Apply Faux Sewing along edge of pocket using Uni-Ball Gel Pen
9. Adhere to dress

TIP –
To give a different look –
 Attach a flower, Brads or Buttons instead of bow
 Place a small row of Rhinestones along the top, running from sleeve to sleeve
 Add another layer – opposite side of DSP or something entirely different - Translucent

The List is endless, but I kept mine very clean and simple on purpose!

If you would like to play along all you have to do is create a card/project and upload it to your blog and/or to your SCS Gallery using the keyword C4C18.  Don't forget to go to http://www.crazy4challenges.blogspot.com/ to upload your card, so as everyone else can see it too.

Until next time, have a great night
Vicky

Saturday, 2 January 2010

Tutorial...

 I have finally managed to finish off the tutorial for the long notebook I posted Here!  I did have it all written up, but had not taken any photos.

Note - You will find I have used both metric & standard measurements for this tutorial! Whatever was easiest!


Supplies Required –
Cardstock – Kiwi Kiss, Baja Breeze, Whisper White
Ink – Going Gray, Kiwi Kiss, Baja Breeze
Stamp Set – 5th Avenue
Punches – Scallop Oval, Oval
Accessories – Snail Adhesive, Sprinkles, Uni-Ball Gel Pen, Grosgrain Ribbon – Kiwi Kiss
 Magnet


Instructions –
Cover – as per photo
1. Cut Cardstock – 17cm x 27cm
2. On the 27cm side, score up from bottom – 8cm
3. On the 17cm side, score at ½”, 3 ½” & 3 5/8”
4. Starting from bottom score line, score at 4”
5. Fold score lines

Pocket – as per photo

1. Cut along ½” LHS score line to bottom of line
2. Cut along LHS score line to ½” score line
3. Cut along RHS bottom score line to 2nd score line – Spine
4. Cut “V” shape both side from bottom line
5. Fold along score lines in towards inside of cover
6. Adhere flaps
7. Decorate/Embellish as required

Notebook – as per photo

1. Cut Kiwi Kiss – 2 ¾” x 1 ¼”
2. Score Kiwi Kiss at 2 ½” x 1”
3. Fold along score lines
4. Adhere to top of notebook, ensuring that the score lines fit firmly against the spine of the notebook
5. Cut DSP 2 5/8” x 1 1/8”
6. Adhere to Kiwi Kiss
7. Apply snail adhesive to spine & back of cover
8. Adhere notebook to back cover
9. Decorate/ Embellish top of notebook as required

Labels – as per photos

1. Type Labels on PC & print onto Whisper White
2. Using Oval Punch, punch Whisper white
3. Using Scallop Oval, punch 2 pieces of Kiwi Kiss
4. Adhere Whisper White to Kiwi Kiss
5. Adhere “Receipt” Label to inside pocket
6. Adhere “Shopping List” Label to outside cover

Cover – as per photo
1. Cut Kiwi Kiss 2 ½” x 7 ½”

2. Cut DSP – 2 3/8” x 7 3/8”
3. Adhere DSP to Kiwi Kiss
4. Attach ribbon across centre of cover , ensuring there is enough either side to tie a bow/knot
5. Adhere Kiwi Kiss to Baja Breeze
6. Stamp 5th Avenue onto Whisper White
7. Cut flowers & adhere to cover of notebook as required


Tip – Adhere magnet to back cover if required for fridge – shopping list always at hand!
If you have trouble understanding, please do not hesitate to contact me
Enjoy
Vicky

LinkWithin

Related Posts Plugin for WordPress, Blogger...