Today's topic is Storing Your DSP. I know everyone has their own way of storing their Cardstock, but this is the way that works best for me & hopefully will help you in sorting your DSP & storage issues, if you have any.
People store their DSP & Cardstock in a lot of different ways. I think it is best to do it the way you are most comfortable with & what suits you
As my space is limited, my A4 Cardstock is stored lying flat & in SU Colour Family. I have a couple of drawers that are made for A4 Cardstock & about 3 colours of each from the one family are stored in each drawer. On the front I have a small colour sample of each with the name written each colour. I know exactly what colour/s each drawer has & because this has been my system for years, I don’t even read the front any longer, just open.
 |
| 12" x 12" Cardstock Drawers - LHS |
My 12” x 12” Cardstock is stored in drawers where each drawer holds a Colour Family, including IN Colours. The Cardstock is not taken out of the plastic bag it comes in, but stays in there so that when I need a colour, I just pick up the whole pack & select the colour I want.
Nothing too fancy, but it does suit me & I have had this system for years.
I love my SU! DSP, although it does take me a little time to purchase some of it! It is stored completely different.
When I purchase a packet of DSP, I open it from the top & leave it in the plastic packet until such time as it there is none of it left. I find this works best for me as I am able to store my scraps inside, AND contain them… Who can toss out a scrap of DSP – NOT ME!!!!!. I also find that there aren’t any bent corners to contend with. Doing it this way, there is NO labelling involved!
 |
| Information Form... |
When my DSP order has arrived & as I love to co-ordinate, I fill in all the information pertaining to the DSP onto a small form I have created & place in front of each pack of DSP. This way, I find I don’t have to keep going to the Idea Book & Catalogue to see what colours go with the DSP, what stamp sets match, dies, etc. It is all there for me….
It did take me some time to work this system out, but now that it has been refined to suit me, I love it!!!! I could easily just write the information on the back, but I sometimes take the thin piece of white card & use it on my projects.
All current DSP sits on top of the boxes that hold my retired DSP.
 |
| Retired DSP in their boxes with currect DSP sitting on top... |
Retired DSP on the other hand is something entirely different.
Once a DSP has been retired, I grab the whole lot & store in 12” x 12” boxes for that year. I mark the boxes with the year & the matching Catalogue.
Storing DSP & Cardstock as above works for me and is taken me years to refine it. Believe me when I say I have just about tried everything, as has most of us. If there is a specific idea that I have seen & works for me, I will give credit where credit is due. I hope this helps you a little on trying to sort out the way you store your papers & cardstock.
Okey Dokey, on with today's sketch & layout!
 I took this sketch from a very old layout I had completed about 5 years ago. I love the simple, clean looks of the sketch, although it is open for a lot more. It is entirely up to yourself.
 After seeing my photos, you will understand the reason for leaving my pages the way they are. Mind you, if I come across something that I think will suit the page, I will add them at a later stage. That is the great thing about scrapbooking, you can add later on!
Because I didn't want to change the colour of the photos, I decided to stick with the oh so very bright colours & try & work them into the pages, finally deciding to work with the colours of Avatar's costume - Bonnie! Please ignore the creases in the DSP. Since taking the photo, I managed to get the creases out by placing a pillow case over the page & ironing over the top of the creases.
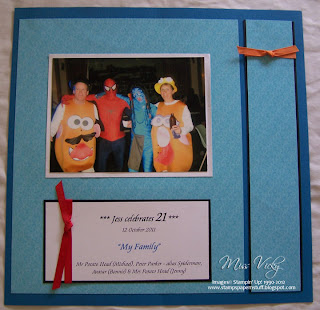
Once I created the first page, I thought it only proper that I do another page with a photo of his family.
As I stated above, the photos are so very bright that I left them blank intentionally & just embellished with a little bit of Ribbon & DSP.....
I really love the costumes my brother & sister-in-law wore - Mr & Mrs Potato Head. If only you knew Michael - it suits him to a "T"!!!!! Love It!!!!
Supplies -
Cardstock - Textured Pacific Point, Basic Black, Whisper White
DSP - Pink Flamingo 2009-2010
Ribbon - 1/4" Grosgrain - Pumpkin Pie, Real Red
Accessories - Snail Adhesive
Remember, Scrapbooking is meant to be FUN!!!


No comments:
Post a Comment