Showing posts with label Cards - Birthday. Show all posts

Sunday, 19 January 2014

Sweet Birthday...

I have another niece's birthday in a couple of days & this is the card I created for her.

I had such a hard time trying to think of an easy layout for her that I ended up so confused & put myself into a corner.  Pinterest to the rescue!  I kept the colours I wanted to use & the embossed piece too.

Supplies -
Stamp Set - Cycle Celebration - 130273
Ink - Melon Mambo - 126948, Tempting Turquoise - 126952,   Daffodil Delight - 126944
Cardstock - Whisper White - 106549, Melon Mambo - 119980
Embossing Folder - Alphabet Press - 130916
Punches - Decorative Label - 120907, Large Oval - 119855
Accessories - Snail Adhesive - 104332, Stampin' Dimensionals - 104430


Tutorial for you to copy & save if you wish
 
"Cycle Celebration"
Sweet Birthday
 
  •  To order Stampin' Up! products online, please Shop Here
  • Want to join my family, and be a part of a group that loves to stamp together, Join Here
  • To check out available classes or to attend any of the classes, please Click Here, click on the "Classes/Workshop" Page or email me vickiawright@bigpond.com
Until next time, Happy Stampin'
 
Vicky

Friday, 17 January 2014

Happy Birthday....

My volunteer class started back today after a couple of weeks break.  I used the break to my advantage by planning 3 months of classes including the cards we will be creating In Crafty Creations. 

Mind you, in saying that, the ladies know what I am like & will probably change half of them by the time we get around to creating them, but that is part of the fun & the unexpected!

As with Friday's card, I usually CASE this one - Copy & Share Everything.  This week is no different.  I found this card on Pinterest by Beverlee Morales which I thought the perfect card to start the new year off with.  I only hope the ladies like it as much as I do.  Thank you Beverlee for your inspiration.

Supplies –
Stamp Set             N/A
Ink                          N/A
Cardstock             Whisper White - 106549, Palm Plum – 108615, Pretty in Pink - Retired
DSP                        Pretty in pink – Retired, Pear Pizzazz – DSP Retired
Embossing F        Alphabet Press – 130916, Stripes - 123128
Punches                Small Heart - 117193
Accessories          Snail Adhesive – 104332, Stampin’ Dimensionals – 104430, Rhinestone Basic Jewels –         119246, Glue Dots - 103683
Non-SU!                Wire, Ribbon

If you don't have the papers, etc, all you have to do is change it around to suit yourself. This would make a great Valentine's Card by changing out the colours, etc


Click on the link below to print your copy of the tutorial.
Remember this will print onto A5 size paper


Until next time, Happy Stampin'

Sunday, 12 January 2014

Happy Birthday...

... to one of my brother's.  I have 2 brothers who celebrate their birthdays this month & only a couple of days apart.
 
Today's card is the one I created for the younger of the 2.  When he was younger he rode competitive Cross Country, so I thought this stamp, although retired, would be perfect for him.
 
I have actually completed all my birthday cards for January & February & have them all written out & ready to post about 10 days prior to the date.  I can't believe I am back to my old ways - fingers crossed that it will continue throughout the year!
Supplies –
Stamp Set - Motorcycle (Retired), Teeny Tiny Sentiments – 120024, Gorgeous Grunge - 130517
Ink - Early Expresso – 126974, Crumb Cake – 126975, Marina Mist - 126962
CardstockWhisper White - 106549, Marina Mist – 121682, Early Expresso - 121686
Embossing Folder - Chevron – 127749
Framelits - Bitty Banners - 129267
Accessories - Snail Adhesive – 104332, Stampin’ Dimensionals – 104430, Stampin’ Marker – Early Expresso - 119680
Inside Card -


 Click on the link below for your Tutorial to create the same card
 
 
  •  To order Stampin' Up! products online, please Shop Here
  • Want to join my family, and be a part of a group that loves to stamp together, Join Here
  • To check out available classes or to attend any of the classes, please Click Here, click on the "Classes/Workshop" Page or email me vickiawright@bigpond.com
Until next time, Happy Stampin'
 
Vicky

Thursday, 26 September 2013

Technique Class....

As usual I am a little behind in posting one of the cards we did in our Technique Class a couple of weeks ago.  We focused on "Double Embossing"  If you haven't played with this technique, make sure you do, as it is a lot of fun & so many possibilities. In this class we concentrated on 2 of the may possibilities.

Today's cards is the more traditional way of "Double Embossing".  We also concentrated on Father's Day.  For those who didn't want to create a card for Father's Day, they use "Birthday Wishes" instead.

To create my card I combined a couple of different cards together from Pinterest.

Card -
 
Our Bonus Project was a Wine Label to match the card 
 
I then created a Post-It Note Holder when I got home
 
This is the set together, including a matching Gift Card 
 
Until next time, when I will show you the 2nd card we created
 
Happy Stampin'
 
Vicky

Sunday, 22 September 2013

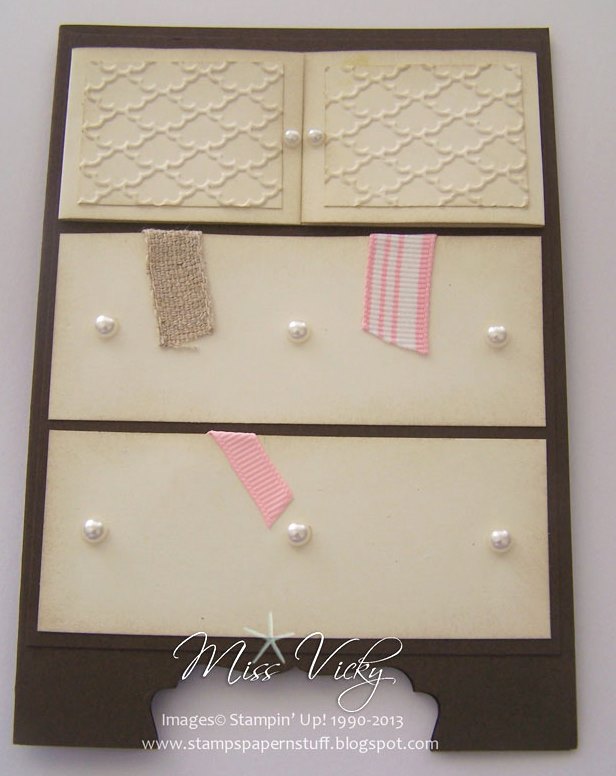
Cupboard....

... Stampin' Up! style.
 
This is another card I cased from Pinterest.  Thank you Michelle for your inspiration.  The ladies at Crafty Creations loved it!  Mind you it is now quiet some time we created it!

This card makes for heaps of possibilities with some of the ladies creating the card aimed at babies, kids & in general.  It would perfect for the teenager too!
  
Supplies –
Stamp Set            Happiest Birthday Wishes (Retired)
Ink                           Pretty in Pink (Retired), Crumb Cake - 126975
Cardstock             Very Vanilla - 106550, Chocolate Chip - 108599
Ribbon                   Natural Trim – 129287, Pretty in Pink (Retired)
Embossing Folder Fancy Fan – 127751
Punches                 Decorative Label - 120907
Accessories           Big Shot - 113439, Snail Adhesive – 104332, SU Sponge - 101610, Pearls - 119247

Front - 
 
 Cupboards Closed - 


Tutorial to create your Cupboard
 
  •  To order Stampin' Up! products online, please Shop Here
  • Want to join my family, and be a part of a group that loves to stamp together, Join Here
  • To check out available classes or to attend any of the classes, please Click Here, click on the "Classes/Workshop" Page or email me vickiawright@bigpond.com
Until next time, Happy Stampin'

 Vicky

Thursday, 5 September 2013

Card # 2...

... from our "Misc Card" class last month - August.


With Father's Day coming up, it was perfect timing to create a card especially for Dad or the male in your life.  It is the perfect card for anyone who happens to play a "little" golf.  Is there such a word as "a little golf"?

We used the beautiful new Regals Designer Series Paper Stack for this card & would you believe it, one of the designs looked just like an image in the stamp set, so of course, we had to use it together.

Since the change to the Colour Families, I am really enjoying the Regals Family & am going to have to put a halt to the whole lot soon or everyone will be sick of them & think there is no other colours.  They are just so lovely!

Supplies -
Stamp Set - Pennant Parade - 122742
Ink - Night of Navy - 126970, Garden Green - 126973
Cardstock - Whisper White - 106549, Night of Navy - 106577, Basic Black - 121689, Early Expresso - 126974
DSP - Designer Series Paper Stack - Regals - 130139
Punches - Petite Pennants Builder - 122361, Large Oval - 119855, 1/2" Circle - 119869
Accessories - Big Shot - 113439, Simply Scoring Tool - 122334, Snail Adhesive - 104332, Glue Dots - 103863,  Multipurpose Glue - 110755, Stampin' Dimensionals - 104430

 
  •  To order Stampin' Up! products online, please Shop Here
  • Want to join my family, and be a part of a group that loves to stamp together, Join Here
  • To check out available classes or to attend any of the classes, please Click Here, click on the "Classes/Workshop" Page or email me vickiawright@bigpond.com
Until next time, Happy Stampin'
 
Vicky

Sunday, 1 September 2013

September Kits...

... are now up & available for purchase.  This month I have selected the very versatile stamp set
"By the Tide"
 
This is a great set for both males & females.  The cards this month could be used for either!  I've also used the "Brights" Colour Family & Marina Mist from the "Subtle" Family.  Lets face it, how can you not use a blue with a nautical theme!

 To purchase your kit, all you have to do is click on Pre-Cut Kits & it will take you straight to the page where you will see the PayPal Drop Down Button.  Once your kits have been posted, you will then receive your PDF Tutorial via email.
 
  •  To order Stampin' Up! products online, please Shop Here
  • Want to join my family, and be a part of a group that loves to stamp together, Join Here
  • To check out available classes or to attend any of the classes, please Click Here, click on the "Classes/Workshop" Page or email me vickiawright@bigpond.com
Until next time, Happy Stampin'
 
Vicky

Wednesday, 28 August 2013

August Class...

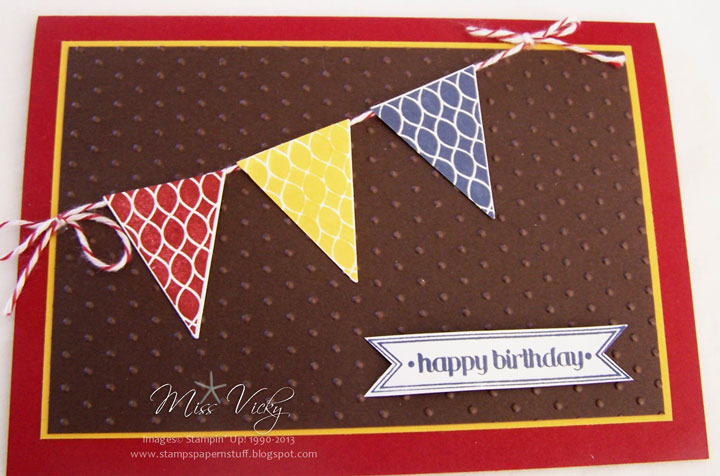
My share today is one of the 3 cards we did in our August Classes - "Misc Cards".

As I get a lot of requests for male cards, thought it would be a great idea to showcase the great little stamp set "Pennant Parade", Page 18 of the new catalogue.  This set is perfect for all occasions.

We also concentrated on a couple of  key colours for our cards - Cherry Cobbler, Crushed Curry, Early Expresso, Whisper White, Garden Green & Night of Navy.  I like to show people that you do not need everything in the catalogue (although it would certainly nice to have it all) to create lovely cards.

This is not my original idea as I saw something like it on Pinterest, but didn't say it.  I only sort of remember seeing it & for some reason it stuck in my mind.  I did change it a little though.

I don't have a tutorial for today's card, but will post one with all 3 cards once I have posted the last card.

Supplies -
Stamp Set - Pennant Parade - 122742, Itty Bitty Banners - 122497
Cardstock - Whisper White - 106549, Cherry Cobbler - 121681, Crushed Curry - 131288, Early Expresso - 126974,
Ink - Night of Navy - 126970, Crushed Curry - 131173, Cherry Cobbler - 126966
Punches - Petite Pennants Builder - 119849
Baker's Twine - Cherry Cobbler - 123125
Embossing Folder - Perfect Polka Dots - 117335
Framelits - Bitty Banners - 129267
Accessories - Big Shot - 113439, Simply Scoring Tool - 122334, Snail Adhesive - 104332, Glue Dots - 103683, Multipurpose Glue - 110755, Stampin' Dimensionals - 104430
 
  •  To order Stampin' Up! products online, please Shop Here
  • Want to join my family, and be a part of a group that loves to stamp together, Join Here
  • To check out available classes or to attend any of the classes, please Click Here, click on the "Classes/Workshop" Page or email me vickiawright@bigpond.com
Until next time, Happy Stampin'
 
Vicky

Sunday, 18 August 2013

SC 086/13...

Our challenge over at Sunny Challenges & Creations has been set by me.  Again, she has been very kind to us by only stating that we have to create a " Shaped Card".

My card this week is what is called a "Twisted Card".  This have been around for some time, but had only sort of ever created half ones & never completed any. 

If you "Google" "Twisted Card", all sorts of ideas will come up, including tutorials.  I didn't take any tutorial to create mine, but preferring to do it my way.  I turned mine into a Gift Card Holder & added a piece for the writing on the left hand side.

Over the next week, I hope to have a tutorial for the card, but in the meantime, will give you my supplies for what I used.

I've decided to enter the card into the challenge over at LNS (Latenight Stampers) to which I belong to.  Their challenge this week is to use "Speciality Paper" on your card.  It isn't really a "Speciality Paper", eg Vellum, but seeing as though I hadn't completed a challenge there in awhile, it would be fun just to enter. 


Supplies -
Stamp Set - Flower Shop, Itty Bitty Banners
Ink - Basic Black, Bermuda Bay
Cardstock - Basic Black, Very Vanilla
DSP - Modern Medley
Punches - Pansy Flower
Framelits - Bitty Banners
Accessories - Snail Adhesive, Stampin' Dimensionals, Large Pearls, Tea Lace Paper Doily, Sponge

 
Be sure to check out what the other Design Team Members & our very talented Guest Designers have created by heading over to Sunny Challenges & Creations.  Create your "Shaped Card", post to your online group, blog, facebook or forum & link back to Mr Linky.
 
Until next time, Happy Stampin'!
 
Vicky

Sunday, 11 August 2013

SC 085/13...

I am a little late in posting my card for our challenge over at Sunny Challenges & Creations was given to us by Kris.  We have the Sketch only!

Not only am I late in posting, but unfortunately I don't even have any measurements for you as I sold the card at the Handmade Expo last Sunday.  I didn't realise it had been sold until I just went looking for it.....  Always the way.

I will try & remember what I used on it from the photo & memory.  I originally found a lovely card created using this Origami Dress.  I then traced it back to the Website.  Me being me, I did alter the measurements to suit the card.  Laura is one talented stamper.  Click on the word "Laura" & it will take you direct to the video.

Lately I seem to be creating a lot of cards with Early Expresso & the Regal Colour Family.  Since Stampin' Up! revamped their colours, I am loving the Regals AND I am not a Regal Lover.

Supplies -
Stamp Set - Express Yourself
Ink - Rose Red
Cardstock - Early Expresso, Whisper White, Rose Red
DSP - Designer Series Paper Stack - Regals
Punches - Scallop Oval, 1 3/4" Circle, Modern Label, Word Window
Embossing Folder - Perfect Polka Dots
Accessories - Stampin' Dimensionals, Snail Adhesive, Gel Pen - White, Tea Lace Paper Dollies


Card & Envelope 
 
Don't forget to head on over to Sunny Challenges & Creations to check out what Kris & Gwen have created.
 
Until next time, Happy Stampin'
 
Vicky 

Sunday, 21 July 2013

SC 084/13...

This could be a very short post as I am having big issues with my mouse & pc.

It was Gwen's turn to set our challenge this week over at Sunny Challenges & Creations & once again she has been easy on us.

All we have to do is create a card for a Male!  It could be a scrapbook page, 3-d project or anything else you can think of.  Some of us have trouble creating male cards, so hopefully with the lovely ideas the Design Team have should help you on your way.

I started with a sketch from another challenge, but somehow got off track & only created using the sketch so far & then I sort of went off on my own, which means I won't be entering it in the other challenge.  Thank you Mary-Jo for your inspirational challenge!

I will be the first to admit I haven't used Chocolate Chip in a long time, so decide to use that for my Base Card.  I wanted the colours to be beachy without going traditional, so I teamed it with Tangerine Tango with a touch of Always Artichoke.  I'm really happy with the final result, although the picture does not do it justice.  For some unknown reason I had a hard time taking a photo of this card.  The photos all seemed to be blurry.....

Supplies –
Stamp Set              By the Tide – 129120, Express Yourself - Hostess
Ink                           Tangerine Tango - 126946, Chocolate Chip - 126979, Always Artichoke - 126972
Cardstock              Very Vanilla – 106550, Always Artichoke - 108610, Tangerine Tango - 116206, Chocolate Chip - 108599
Embossing Folder Woodgrain - 127821
Punches                 Modern Label – 119849, 2 ½” Circle - 120906
Accessories           Big Shot - 113439, Snail Adhesive – 104332, Stampin’ Dimensionals – 104430,
                                 Multipurpose Liquid Glue - 110755
 
Inside Card -
 
Card Front -
 
Please click on link below for your tutorial


Now it is your turn.
 
Hop on over to Sunny Challenges & check out what Gwen, Kris & Jonia have created.
 
Until next time, Happy Stampin'
 
Vicky


Thursday, 18 July 2013

Birthday Wishes....

I've been a huge fan of Silke Leglow way before I started Stampin' Up!  I love her clean crisp cards.

Today's post is one of the cards we did in a class way back in May but of course I changed it to suit Stampin' Up! products.  Thank you so much Silke for your inspiration!

Inside Card -
 
Card Front -
 
Tutorial for you create your own card


  •  To order Stampin' Up! products online, please Shop Here
  • Want to join my family, and be a part of a group that loves to stamp together, Join Here
  • To check out available classes or to attend any of the classes, please Click Here, click on the "Classes/Workshop" Page or email me vickiawright@bigpond.com
Until next time, Enjoy
 
Vicky
 

Wednesday, 26 June 2013

Patterned Occasions.....

My card today is one I created using the set "Patterned Occasions" which was in our SAB this year.  It is a great card for the teenage girl.
 
It was created using similar products to the card I posted a few days ago but with a few minor changes.


Until next time, Happy Stampin'
 
Vicky

Saturday, 22 June 2013

Bloomin' Marvellous....

Very short post today.
 
Yet another card created in our Crafty Creations class sometime ago.  Stamps & DSP used on the card was from SAB 2013.  Don't you love these colours together?

Inside Card - RHS...

Inside Card - LHS...
 
 
Tutorial for you to create your own


Until next time, Happy Stampin'
 
Vicky


Monday, 10 June 2013

SC 081/13...

Our challenge over at Sunny Challenges & Creations is to use something from the Seasonal Catalogue before it retires - 30 June - & create a card, scrapbook page or 3-D item.  The list is endless.

I had so much going around in my head about what to do, so instead of going to create something new, I decided to pull out my "Another Day" Box - that is what Gwen calls it!!!!!!  Don't you love that name?  I think it is a perfect name for that box that we all have sitting somewhere in our Craft Rooms.  Mine just happens to sit on my desk.  I often find myself going through it & finding "stuff" that I had completely forgotten I had started & didn't finish.  My card is one of those!!!!!!

When the Catalogue first come out I was just so excited to find a sea set sitting there waiting just for me to get my hands on.  Anything to do with the beach & I am "gone".  "By the Tide" was the first set I purchased.  In fact it was a purchase by itself & started playing as soon as it arrived, but then obviously didn't finish it.  All I had to do was basically add the Base Card & that was it!  How easy was that?  Everything had already been done.


We would love for you to join us this week.  All you have to do is head on over to Sunny Challenges & Creations, check out what Kris & Alison have created.  Create your card, scrapbook page or 3-D item, post to your blog or on line group/forum & then head back & link with Mr Linky.
 
Until next time, Happy Stampin'
 
Vicky

Wednesday, 5 June 2013

By the Tide 2....

Today's card is our 2nd card we created using the stamp set "By the Tide" from the current Seasonal Catalogue.  Not only did we use this stamp set, but we used the Technique "Ghosting/VersaMark Resist" & the Ovals Collections.

In my classes I like to showcase different cards using the same stamp sets & supplies, eg Cardstock, Inks, etc.  I am a firm believer that you do not have to have a lot of cards to achieve great results.

When I first saw the Ovals Collections in the Seasonal Catalogue an idea sprung into my head.  Then when I flipped over to see this great stamp set "By the Tide", I got more excited, as I could combine the 2.......

Supplies -
Stamp Set - By the Tide - 129120, Itty Bitty Banners - 126257
Ink - VersaMark - 102283, Calypso Coral - 126983, Marina Mist - 126962, Bashful Blue - 126961
Cardstock - Whisper White - 106549, Calypso Coral - 124392, Marina Mist - 121682
Embossing Folders - Perfect Polka Dots - 117335
Framelits - Ovals Collections - 129381, Bitty banners - 129267
Accessories - Snail Adhesive - 104332, Sticky Strip - 104294, Sponge - 101610, Stampin' Dimensionals, 104430, Vanilla Shimmer - 118772, Pearls - 119247

Shop Online Here to purchase your own supplies to create your card

Inside Card -

Card Front -
 
By the Tide -
 
Until next time, Happy Stampin'
 
Vicky

Saturday, 1 June 2013

By the Tide....

... was the stamp set we used in our Technique Class for April.  The Technique we did was "Ghosting/VersaMark Resist".   What a fun class this turned out to be with lots of fun, not to mention different backgrounds.

As normal in this class we create a card using the Technique but with a different fold.  Our fold for this class was the "Shadow Box".  If you haven't had a go at this fun fold, then have a go as it is super easy & lots of fun.

We have also been using lots of new stamps from the current Seasonal Catalogue & in this class we showcased "By the Tide".

Supplies -
Stamp Set - By the Tide - 129120, Create a Cupcake - 121982
Ink - VersaMark - 102283, Midnight Muse - 126860, Crumb Cake - 126975, Marina Mist - 126962, Bashful Blue - 126961
Cardstock - Bashful Blue - 106565, Whisper White - 106549, Soft Suede - 119982
Framelits - Ovals Collections - 129381
Accessories - Snail Adhesive - 104332, Sticky Strip - 104294, Sponge - 101610

 
Shop Online Here to purchase your own supplies to create your card
 
Pop on back in a couple of days & I will show you the 2nd card we created using the same Stamp Set & Technique.
 
Until then, Happy Stampin'
 
Vicky

Sunday, 12 May 2013

SC 079/13....

I would like to take this opportunity to wish all the mums out there a very "Happy Mother's Day"!  I hope you have all been spoilt with lots of chocolates, flowers & brekkie in bed.

This week's challenge at Sunny Challenges & Creations has been given to us by Kris.  As well as the sketch, we have to create a card, 3-D project or scrapbook page for kids!

How easy can it be?  Well, not so easy I found out!

Inside Card....
Why is it that are there easiest are sometimes the hardiest.  Maybe I was thinking too much into it, who knows.  I think I got there in the end though, as I am fairly happy with the final result.
The card also fits the challenge over at  Latenight Stampers - saying goodbye to our Retiring Colours.  For both challenges I've used "Pretty in Pink".  This is one colour I will be sad to see "retire", but will gladly welcome the new colours.

 What little girl doesn't love "Pink"!  I even managed to sneak some bling onto it too.  Along with the Pink Icing, I think it is the perfect card for a little girl!

Today, we have no print out for the tutorial - Google is playing up, but the tutorial is below for you, just in a different format.


Supplies –
Stamp Set              Create a Cupcake - 121982
Ink                           Chocolate Chip - 126979
Cardstock              Whisper White - 106549, Pretty in Pink – 106568, So Saffron – 108611,
                                 Rose Red - 108613
DSP                         Colour Collection – Subtles – 117152
Embossing Folder Perfect Polka Dots – 117335, Elegant Lines – 119277, Woodgrain – 127821
Punches                 Cupcake Builder – 121807, Itty Bitty Shapes - 118309
Accessories           Big Shot - 113439, Snail Adhesive – 104332, Stampin’ Dimensionals – 104430,
                                 Multipurpose Liquid  Glue - 110755, Rhinestones - 119246

Measurements –
1 x Whisper White Cardstock            11 ¾” x 41/8” or 29cm x 10.5cm
1 x DSP - So Saffron                              1 ¾” x 4 1/8” or 4.5cm x 10.5cm
1 x Whisper White Cardstock            1 5/8” x 4 1/8” or 4cm x 10.5cm
1 x DSP - So Saffron                              3 ¼” x 3” or 8.5cm x 8cm
1 x Whisper White Cardstock            3 1/8” x 2 7/8” or 8cm x 7.5cm
1 x Whisper White Cardstock            1 ½” x 5 7/8” or 4cm x 15cm
1 x DSP – Pretty in Pink                       1 3/8” x 5 7/8” or 3.5cm x 15cm
Scraps Cardstock                                 So Saffron, Pretty in Pink & Regal Rose
 
Instructions –
1.         Run 1 5/8” x 4 1/8” or 4cm x 10.5cm & 3 1/8” x 2 7/8” or 8cm x 7.5cm Whisper White Cardstocks through Big Shot using Perfect Polka Dots Embossing Folder
2.        Adhere 1 5/8” x 4 1/8” or 4cm x 10.5cm  embossed Whisper White to 1 ¾” x 4 1/8” or 4.5cm x 10.5cm  So Saffron DSP prior to adhering to Base Card – Whisper White
3.        Adhere 1 3/8” x 5 7/8” or 3.5cm x 15cm DSP – Pretty in Pink to 1 ½” x 5 7/8” or 4cm x 15cm Whisper White prior to adhering to Base Card – Whisper White
4.       Adhere 3 1/8” x 2 7/8” or 8cm x 7.5cm embossed Whisper white Cardstock to 3 ¼” x 3” or 8.5cm x 8cm DSP – So Saffron prior to adhering to Base Card – Whisper White with Stampin’ Dimensionals
5.        Punch 4 cupcake bottoms from scrap So Saffron Cardstock prior to running through Big Shot using Woodgrain EF
6.       Space cupcake bottoms to square embossed Whisper White prior to adhering with Multipurpose Liquid Glue
7.        Punch 4 cupcake tops from scrap Pretty in Pink Cardstock prior to running through Big Shot using Elegant Lines EF
8.       Adhere to cupcake bottoms with Stampin’ Dimensionals
9.       Punch 4 small flowers from scrap Rose Red Cardstock with small Flower from Itty Bitty Punch Pack
10.     Adhere small Rhinestone to centre of each flower prior to adhering to top of cake with Multipurpose Liquid Glue
11.      Stamp greeting/sentiment to direct to Pretty in Pink DSP with Chocolate Chip Ink

Don't forget to pop on over to Sunny Challenges & Creations & check out what Kris has created.

You have 2 weeks to complete your challenge, post it to your blog or online forum/group & link back with Mr Linky.

Until next time, Happy Stampin'


LinkWithin

Related Posts Plugin for WordPress, Blogger...