Monday, 31 May 2010

5th Avenue....

G'day Stampers,

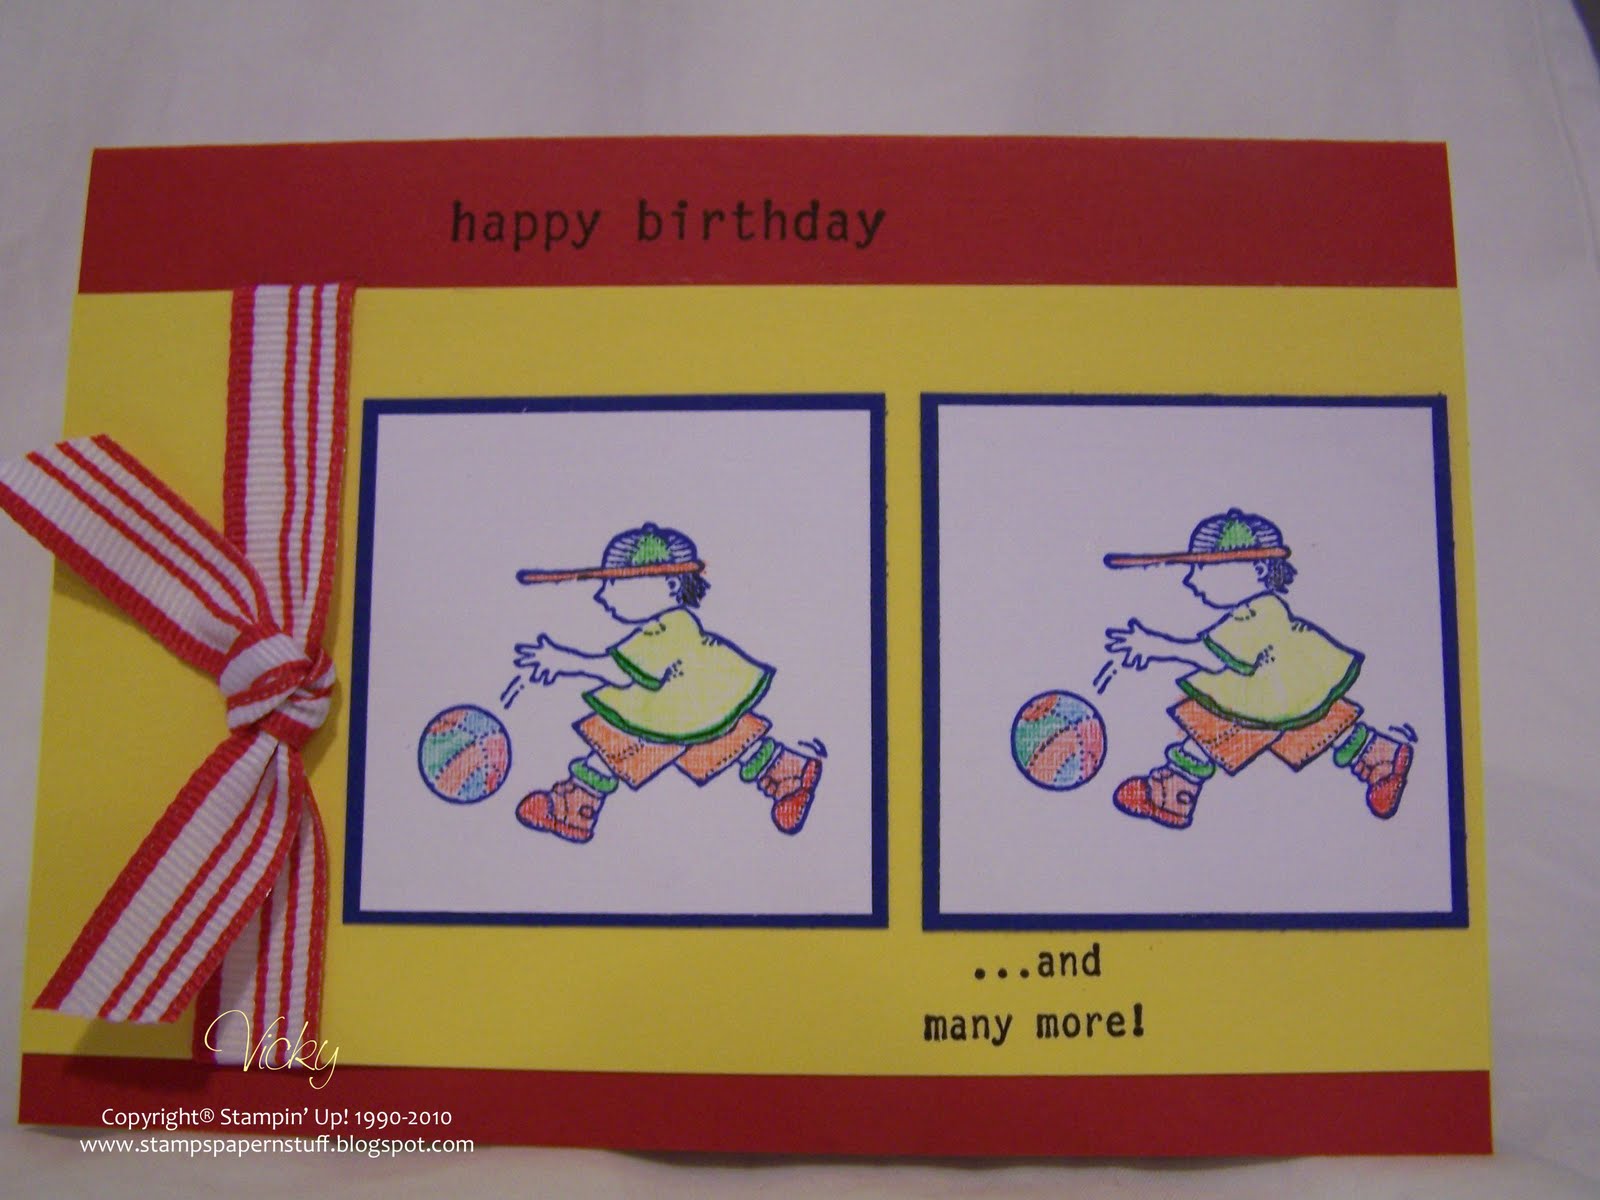
I made a test card last night using one of the techniques which is on offer this month - Blurred Watercolouring.  This is a very easy, quick & fun technique to do.  This is not the card we will be making, but just wanted to show you the end result!

Please contcat me if you would like to attend one of my classes as I still have spaces available - vickiawright@bigpond.com

First class starts tomorrow @ 10.00am - BYO Adhesives

Supplies -
Stamp Set - 5th Avenue
Ink - Basic Black, Riding Hood Red
Cardstock - Very Vanilla, Basic Black, Rich Razzleberry
Accessories - Snail Adhesive, Aqua Painter, Grosgrain Ribbon - Rich Razzleberry

Until next time

Enjoy!

June Promotions...

G'Day Stampers,
 It has been a little while since my last post, but I hope to change that this week & post a couple of new cards, projects & pages.
 During the month of June, Stampin' Up!® will be offering several discounted products to be known as “Deals of the Week”. NO limits and NO minimum purchase is required.

 Schedule as follows –
Deal # 1 Tuesday, 1 June @ 12.01 am
Deal #2 Wednesday, 9 June @ 12.01 am
Deal #3 Wednesday, 16 June @ 12.01 am
Deal #4 Wednesday, 23 June @ 12.01 am
 Please remember –
• Deals may be purchased at Workshops or as Customer Orders
• Deals are only available at their discounted price during the specified time. At any other time during the month, the item will at the regular price
• Individual Products will not be announced early. All Deals of the Week announcements will be made on the dates & times as per above
• There is NO minimum purchase required to participate in this promotion
• There is NO limit to the number of Deals of the Week items a customer may purchase
• ALL Deals of the Week are current products and featured in the 2009-2010 Idea Book & Catalogue
As a demonstrator, we are usually informed prior to any specials, but for June, we will find out the same time as you.
 At the beginning of each new deal, I will email you the Deal of the Week.
 Order deadlines for each Deal of the Week will be as follows -
 Deal of the Week Ending Date Phone Ordering Deadlines -
#1     1 June 2010 5:20 PM (AET) 11:50 PM (AET)
#2   15 June 2010 5:20 PM (AET) 11:50 PM (AET)
#3   22 June 2010 5:20 PM (AET) 11:50 PM (AET)
#4  30 June 2010 5:20 PM (AET) 11:50 PM (AET)
*The deadline for each new deal is 10 minutes before the next deal is announced.
 I will be posting the Deals on the blog as well as emailing everyone first up each morning the new deals begin.
 Enjoy!

Saturday, 15 May 2010

Boy's Card...

Warning - Sunglasses required!!!!!!!!!!!

Go on over & have a go at the great challenge they have - details below -
"This week our challenge is to create a card for the special men in our lives, and it's always a good thing to have a card or two in our stash to celebrate their special day! Your challenge this week is to make a masculine birthday card. No tricks or a recipe to follow... Simply create a card for that special guy in your life to celebrate his birthday."

Supplies -
Ink - Brilliant Blue, Basic Black
Cardstock - Real Red, YoYo Yellow, Brilliant Blue, Whisper White
Stamp Set - Birthday Whimsy - Retired
Accessories - Snail Adhesive, Striped Grosgrain Ribbon - Real Red, Watercolour Pencils
Non-SU - Stamp


Until next time, Enjoy! 

Sama.... Sama...

I forgot to post this previously, but same card & sketch as below, changed the ribbon to white.
 
I've used the Pretty in Pink & Aqua Painter to colour the flower, added Dazzling Diamonds & Rhnestones!
 
 A little bit of a different look!
 
Close up - Rhinestones -
Card -

Thank You...

G'Day Stampers,

I have a Sketch for you found over at http://cornwallcraftystampchallenge.blogspot.com so go check it out.  It is # 58 & this is my card from the sketch.


Supplies -
Stamp Set - Flower Fancy, Short n Sweet
Ink - Pretty in Pink, Certainly Celery
Cardstock - Almost Amethyst, Certainly Celery, Pretty in Pink, So Saffron
DSP - Tea Party
 
Accessories - Snail Adhesive, 2-Way Glue, Dazzling Diamonds,
Pretties Kit, Grosgrain Ribbon - Pretty in Pink

Until next time, Enjoy!


Friday, 14 May 2010

Wot The....

You well may ask....

I somehow forgot to post the 2nd half of this Thank You Card... which I did a couple of weeks ago & have only just come across the pics as I was tiding up my photo files....

This is a "Bookmark" which fits neatly over the corner of your books, etc.  I created it with Stampin' Up's® DSP, which means you can have it facing either side.....

Supplies -

Cardstock - Whisper White, Tangerine Orange
DSP - Kiwi Kiss
Accessories - Snail Adhesive

How easy are these?  There are all kinds of designs & patterns you are able to use on them, including different techniques....

Here is the cards with the Bookmarks attached!  What a great gift!

Until next time, enjoy!


Wednesday, 12 May 2010

Birthday Celebrations...

G'Day Stampers,

I can finally post the 2nd card we did at our Technique class today.  The cards turned out so lovely and bright, the ladies were wrapped in what was created, especially the colours...

I took the same colours from This Card and played around with it here & there, although the brayering was exactly the same.  Instructions for Brayering may be found here...

This stamp set is such a versatile set, that the list of possibilities is endless....


Supplies -
Stamp Set - Upsy Daisy
Ink - Basic Black, Tempting Turquoise
Cardstock - Whisper White, Basic Black, Tempting Turquoise
Punches - Eyelet Border
Accessories - Brads, Snail Adhesive, Grosgrain Ribbon - Basic Black,
Embossing Buddy, Powder Pal Tray, Heat Tool, Embossing Powder - Black

Easy Peasy!

If you have any queries, please do not hesitate to contact me

Until next time, Enjoy!

Monday, 10 May 2010

Best Wishes....

After checking out sketch from http://www.stamping411.blogspot.com and wanting to come up with a layout for a Technique Class this Wenesday - Faux Tiles, I thought that maybe I could combine the 2.....  This is the result! 

Mind you, I wanted a male card, but looking at it, could be either male or female.

Close Up -


Supplies -
Stamp Set - Circle Circus, Warm Words
Ink - So Saffron, Not Quiet Navy, Soft Suede
Cardstock - Glossy White, Not Quiet Navy, Soft Suede
DSP - Tea Party
Punches - Word Window
Accessories - Snail Adhesive, Ribbon - So Saffron, Bone Folder, Ruler, Buttons
Non-SU - Buttons
Autumn-Winter Mini-Catalogue 2010

I have previously completed a tutorial for this technique, but the way I did it on this card is a little different & will post tutorial for this Wednesday.

Until next time, enjoy!

Best Wishes...

Another card which I thought I would post today.  My Technique Class this week is Brayering....  Although it is a very basic card, I love the colours and the way it has turned out!

I've taken the card design from an old card pre-Stampin' Up!®, twigged it here & there, added & subtracted.....

Supplies -
Stamp Set - Upsy Daisy, Warm Words
Ink - Tempting Turquoise, Basic Black, Versa-Mark
Cardstock - Whisper White, Tempting Turquoise
Punches - Large Oval, Scallop Oval
Accessories - Snail Adhesive, Grosgrain Ribbon - Tempting Turquoise, Brayer, Stamping Buddy, Powder Pal Tray, Embossing Powder - Black, Heat Tool
Non-SU - Rhinestones, Staples - behind the ribbon
If you click Here it will take you directly to a small Tutorial on how to do Basic Brayering..... 

Why not give it a go or better still book in for the class this Wednesday, 11 May @ 1.00pm.

Just so you are aware, this won't be the card we will be making....  they will be posted after the class!

Enjoy!

SPSSS01...

G'day Stampers,

I received this lovely card via email from Jenny for the above sketch & just had to post it so that you could all check it out!

Let me know what you think, as I am sure Jenny would just love to hear your comments.  As she does not have a blog, email your comments to me or to the blog & I will be sure to pass them on.

Thanks for looking!

Enjoy!

Friday, 7 May 2010

Thank You Card...

G'Day Stampers,

It has been a couple of long long days since my last posting.....

I've managed to whip up a quick card for today, without the uncompleted item to go with the card.  In the meantime......

Supplies -
Stamp Set - Pocket Silhouettes
Ink - Not Quiet Navy
Cardstock - Whisper White, Tangerine Orange
DSP - Kiwi Kiss
Punches - 1 1/4" Circle, 1 3/8" Circle
Accessories - Grosgrain Ribbon - Not Quiet Navy, Mat Pack, Snail Adhesive
Non-SU - Rhinestones

I've piereced a single line along the top & bottom of Whisper White, as well as in 3 corners of the Tangerine Orange.  If you click onto the card, you will see a larger image which will be seen a lot clearer.

Until next time, enjoy!

Wednesday, 5 May 2010

G'Day Stampers,


I am a little behind on my postings, so please bear with me while I catch up a little, well try to anyhow.


Today, I am posting a Tutorial on how I did the flower for this Card 


There are probably heaps of tutorials on how to do this flower, but this is the way I did mine.


If you have any hassles or problems understanding, please do not hesitate to contact me.
  
Scallop Circle Flower

 Supplies -
  • Scallop Circle Punch
  • Cardstock
  • Ink
  • Brads/Buttons
  • Spritzer Spray bOttle
  • Handheld 1/16" Punch
  • Sponge/Sponge Dauber
Instructions -
  1. Using Scallop Circle Punch, punch 5 circles
  2. Using Sponge or Sponge Dauber, daub ink around edges of circles
  3. Apply ink a little darker to the middle of top circle
  4. Place on top of each other &using handheld PUnch, punch though centre of all 5 circles
  5. Attach Brad/Button through centre
  6. Using Spritzer Spray Bottle, spray lightly over circles, until just damp
  7. Very gently, scrunch circles, one layer at a time
  8. Let dry
  9. Once dry, attach to card
Hope you enjoy this tutorial & more importanly enjoy creating these lovely flowers......

Until next time, Enjoy!

Monday, 3 May 2010

Manly Monday...

I've wanted to make a male card using "Totally Tool" with the background embossed to make it look like a board.  After checking out the sketch SSC149 this is what I have come up with.

My Card -
Supplies -
Stamp Set - Totally Tool, Best Yet
Ink - Basic Gray, Old Olive
Cardstock - Very Vanilla, Basic Gray, Old Olive
Punches - 1 3/4" Circle, 1 1/4" Circle, 1/16" Handheld
Embossing Folder - SU Perfect Polka Dots
Accessories - Brads, Big Shot, Grosgrain Ribbon - Old Olive, Snail Adhesive, Sponge
Non-SU - Alfoil

To ensure the end result was a little stronger, I run 2 layers of Alfoil through the Embossing Folder.  This gave me a little more strength to work with.

 I've stamped the screwdriver onto Very Vanilla Cardstock &
punched a hole through the top of screwdriver, attached a silver brad so that it looks like it is hanging from the wall.

I then sponged a little of Basic Gray & Old Olive around so that it seems like there is a little oil, etc on the board.

To carry the theme through, I punched a hole through the "o" in "You" for a silver brad

Until next time, Enjoy! 

Sunday, 2 May 2010

Sketchy Sunday SPSSS #01...

G'Day Stampers,

I thought I would try something a little different & go for a sketch every Sunday.  So if you have nothing to do, please play along or have a go at making a card, 3-D Project, or anything your heart desires using the sketch.
I've taken this sketch from one I use over and over before my Stampin' Up! days.

As we all have all have bits and pieces stashed all over the place and purchased from everywhere, please don't feel that you are restricted to using all Stampin' Up! products. 
If you are using SU supplies, please feel free to use current or retired stamp sets.  I'm sure there are a lot of your favourites which are retired and you no longer get to use!

Don't panic, if you have never played along with a Sketch Challenge - it's as easy as 1 2 3!
1   Create your card
2   Post it online somewhere, your blog or another online group, eg Splitcoast Stampers is a great place and mark SPSSS #01
3   Post to Mr Linky - please ensure you link to your blog so I am able to find it in a few days
Most importantly, have fun and leave comments for each other, as we all know everyone loves a comment!
Mr Linky closes Saturday 8th May @ 10.00pm Aust time

We both eagerly await & look forward to seeing all your wonderful creations!

Flower -
Card -
Supplies -
Stamp Set - Flower Fancy, Oval All
Ink - Pretty in Pink, Certainly Celery, Chocolate Chip
Cardstock - Pretty in Pink, Certainly Celery, Whisper White, Glossy Carstock
Punches - Scallop Oval, Large Oval, 1 1/4" Circle, Scallop Circle
Accessories - 1/2" Striped Grosgrain Ribbon - Pretty in Pink, Brads, Spritzer, Snail Adhesive
Non-SU - Green Flower


Saturday, 1 May 2010

Black & White....

G'Day Stampers,

These couple of cards are from one of my customers who has been playing today.  I've never seen this before and thought them very different, classy & very very striking.

But without further ado, I will let you decide for yourselves. 

Black on White -
White on Black -

I think both cards have been done with a circle punch, but don't quote me on this.  I may have to have a little play in the next couple of days and try and work it out!

Enjoy!

Scrappy Sarurday...

G'Day Stampers,

Seeing as though it is May 1 & the beginning of Scrapbooking Month, what better way to start off than with 2 pages for you.

Very basic simple pages, but I wanted them to be that way.  I didn't want the stamps, etc to take away from the photos.

Page 1 -

Page 2 -
Supplies -
Stamp Set - Bodacious Bouquet (Retired)
Ink - Baja Breeze, Soft Suede*, Kiwi Kiss, Rich Razzleberry*, Melon Mambo*
Cardstock - Riding Hood Red, Pink Pirouette, Pacific Point,
Whisper White, Glossy Cardstock
DSP - Chocolate Chip
Punches - Scallop Oval, Large Oval, Small Oval, 1 3/4" Circle
Accessories - Snail Adhesive

*Autumn-Winter Mini-Catalogue

Until next time, Enjoy!

LinkWithin

Related Posts Plugin for WordPress, Blogger...