Please find below a very easy simple Tutorial.
Heat Embossing
Instructions –
1. Place your card stock in a Powder Pal Tray or over a large piece of scrap paper
2. Rub the Embossing Buddy across the card that you are going to emboss – this keeps the powder from sticking anywhere but on the ink
3. Stamp the image with Craft, Versamark or Embossing Ink
4. Pour powder onto the inked image, ensuring the image is coated completely
5. Shake off or brush off excess powder into the tray & funnel excess back into the container
6. Heat the stamped image only, until such time as the powder changes to a shinny liquid and rises
7. Allow embossed image to cool
I will post a couple of photos tmw stepping you through it. In the meantime if you have any queries or questions, please do not hesitate to contact me.
Give it a go! You will be very happy with how easy it is & what the end result will look like.
Vicky

Wednesday, 30 December 2009
Challenge # 51
The challenge for the week is using Brads on your Cards, Scrapbooking or 3-D Projects.
I've just realised that the top of the box I did for the Stamp Club will be ok for this week's challenge from Late Night Stampers. Very easy & simple. It would also made a great easy 5 minute card.

Please see post below for more details
Until tmw
Stay Safe
Vicky
Stamp Club Project - January...
Good Afternoon Friends,
I have been working on a project for January's Stamp Club.

Supplies -
Stamp Set - 5th Avenue
Cardstock - Baja Breeze, Kiwi Kiss, Going Gray, Whisper White, Not Quite Navy
DSP - Urban Oasis
Accents & Elements - Flower Fusion - Olid Olive
Brads - Earth Elements - Not Quite Navy
Ribbons - Grosgrain - Olive Green, Not Quite Navy
Punches - Scallop Oval, Oval
Accessories - Sticky Strip, Snail Adhesive
Bottom has been made using the bottom of a Origami Box, except with a lid, I wanted to be able to open it from the top and not have to untie ribbons, so this is what I come up with.
Lid Open

I then proceeded to make matching Note Cards & Envelopes. I've left the cards blank on purpose as this way they are able to be used for any occasion. The envelopes I made from Photo-Copy Paper. I've then stamp the corner of the envelopes using 5th Avenue stamp set.
Note Cards & Envelopes

This project is also available via e-mail & post. Please contact me for emailing or posting.
It will include all you require to complete the project, excluding stamps, ink, & adhesives.
If you would like to attend, please email & let me know so that I am aware of numbers.
Until tmw when another card or project will be posted.
Enjoy
Vicky
Tuesday, 29 December 2009
Acetate Window & Box...

Hi Stampers,
I'm a little late in posting tonight. Have been playing again & completed the project that I want to give to the Stamp Club for next month. Will post all the details tmw. I have also completed a couple of gifts at the same time, so will post those in the next couple of days as well.
I always get a little side-tracked when playing & this leads to that, & that leads to this! I start out trying to make something, but in the meantime I have to immediately try something else that suddenly pops into my head!
At the moment, the floor is covered in rejected projects that just didn't make the grade! Luckily I play with photo-copy paper prior to actually making a project.

Supplies -
Stamp Set - 5th Avenue
Cardstock - Pink Pirouette, Whisper White
Ink - Kiwi Kiss, Going Grey, Pacific Point
Punches - Scallop Circle, 1 3/8" Circle, 1 1/4" Circle
Accessories - Sticky Strip, Anywhere Glue Stick, Uni-ball Signo Gel Pen
Glitter - Chunky Sprinkles Light Pink, Light Blue, Celery
Non-SU - Acetate
I hope you enjoy!
Vicky

Challenge - 261209
Good Morning All,
Here I go again, another challenge! I am going to have to give them away for a little as I have a little bit of stuff to catch up before going home.
This sketch to me cried out kids, or maybe that is my excuse!
Anyhow, here it is...........
I heart 2 stamp... Sketch

My Card

Close-Up

Supplies -
Stamp Set - Wild About You
Cardstock - Basic Grey, Pumpkin Pie, So Saffron, Whisper White
DSP - Patterns DSP
Ink - Going Gray, Basic Gray, So Saffron, Basic Black
Punches - 1 14" Circle, 1 3/8" Circle, Word Window
Accessories - Stampin' Dimensionals, Snail Adhesive
Non-SU - Elephant's Eye
I've cut the Lion's Main to bing it to life a little & stuff a couple of SU Dimensionals behind it. I would have drawn the elephant's mouth, but at the moment unable to find my Black Marker!
This is a great set & use it a lot, although sometimes I forget I have it...

Enjoy
Vicky
Calendar Class 2010...
Hi All,

I did forget to mention that I am doing 2 extra classes in January for a Calendar 2010 - as per samples. These have magnets on the back for putting on the fridge.
When booking your spot, could you please let me know which one you would prefer to do, so that I can ensure I have ordered enough stock.
 Venue
Venue
 Time 7.30 – 10pm
# 14 "Circle Circus" Stamp Set
# 15a - "Great Friend" Stamp Set" - Mini-Catalgue - Retired
# 24d - "Always" Stamp Set
For those living out of town or unable to make it to either of the classes and would still like to make one. This is available via email or post for $15.00
Included in all Kits -
Calendar
Full instruction with photos
Cardtsock
Brads
Rhinestone
Pearls
Does not include -
Stamp Sets
Ink
Dazzling Diamonds
Snail Adhesive
SU Dimensionals
Punches
2-Way Glue
If you do not have the stamp sets, please let me know or if you prefer to purchase, plese do not hesitate to contact me
Look forward to hearing from you! This class will be heaps of fun!
Vicky
PS A Tutorial will be posted on the blog for this calendar but until the end of Frnruary!

I did forget to mention that I am doing 2 extra classes in January for a Calendar 2010 - as per samples. These have magnets on the back for putting on the fridge.
When booking your spot, could you please let me know which one you would prefer to do, so that I can ensure I have ordered enough stock.
Class
Calendar 2010
 Venue
Venue My Place
46 Sir Joseph Banks Drive
Golden Beach
Date 18 January 2010
Time 10.00am – 12.00pm
Or
Date 22 January 2010
 Time 7.30 – 10pm
Cost $10.00
Colour Preference - # 14 "Circle Circus" Stamp Set
# 15a - "Great Friend" Stamp Set" - Mini-Catalgue - Retired
# 24d - "Always" Stamp Set
For those living out of town or unable to make it to either of the classes and would still like to make one. This is available via email or post for $15.00
Included in all Kits -
Calendar
Full instruction with photos
Cardtsock
Brads
Rhinestone
Pearls
Does not include -
Stamp Sets
Ink
Dazzling Diamonds
Snail Adhesive
SU Dimensionals
Punches
2-Way Glue
If you do not have the stamp sets, please let me know or if you prefer to purchase, plese do not hesitate to contact me
Look forward to hearing from you! This class will be heaps of fun!
Vicky
PS A Tutorial will be posted on the blog for this calendar but until the end of Frnruary!
Monday, 28 December 2009
Crazy4Challenges - # C4C17
Good Morning All,
Well, I have done it again - another challenge! It is not like I have nothing better to do! Oh wait! I don't, as I am in Brissie, but hopefully not for much longer.
Sketch # 13

My Card

Supplies -
Cardstock - Whisper White, Basic Black
Stamp Set - Oval All - Retired
DSP - Urban Oasis
Accessories - Pretties Kit - Pearl & Flower, Sanil Adhesive
Punches - Scallop Oval - Retired, Small Oval, 3/4" Circle
I've embossed the white with my Cuttlebug, which gives it a bit of a different look. Thought about introducing red into the scheme of things, but kept to the basic black & white!
I am really forcing myself to start using the DSP, but they are just so lovely that I don't want to "hurt" them!
"Urban Oasis"

Until next time - Enjoy
Vicky
Sunday, 27 December 2009
Sketch Challenge - SSC131...
Afternoon Stampers,
Hope you all had a great Christmas & ready for the New Year!
I've just completed a challenge which I wasn't going to do, but it just got the better of me. Hope you like it! Why not have a go yourselves. They are great if you are stuck for inspiration.
SSC 131

Sample 1

Close-Up

Supplies -
Stamp Set - 5th Avenue, Warm Words
Cardstock - Basic Black, Pacific Point, Kiwiw Kiss, Whisper White
DSP - Urban Oasis
Ink - Basic Black, Pacific, Kiwi Kiss
Punch - Small Oval
Accessories - Snail Adhesive Glue, 2-Way Glue, Dazzling Diamonds, Dimensionals
I was going to go with Valentine's, but as it is a couple of months away, thought I would do a general card and use completely different colours to what I usually play with, especially Black.
5th Avenue

Urban Oasis

Have a great day!
Vicky
Thursday, 24 December 2009
Classes...
 Hi Stampers,
I haven't posted for quiet sometime - still in Brisbane!
I am in the middle of organising a couple of classes, Stamp Club & a Scrapbooking Club beginning next month.
The classes are going to be run a little different next year - still guaranteed to be a lot of laughs, fun, while learning new techniques & skills.
Depending on the type of class, will depend on the costing. As usual you are required not have to bring anything, except for your basic tools, sense of humour & friend/s if they would like to attend.
Country & Interstate
If unable to make the class, you will not miss out. You may still participate as I will email the class through to you for a small costing. It will include full instructions and a list of supplies you require to complete the project.
The class is also available via post - Australian residents only! It will include full instructions, all the papers, cardstock, accessories you require to complete the project. Will not include tools, ink pads or stamp sets.
You will be notified of the class via my newsletter. These projects will not appear on the blog for about 4 months - they are for your eyes only!
Overseas
You may still participate as I will email the class through to you for a small costing. Again, you will not miss out! If you would like to receive a newsletter each month letting you know what the monthly class is, please do not hesitate to contact me, as I will only be too happy to include you on my mailing list.
Each month, via the newsletter, I will give you a small sneak peek of the project!
Happy Stampin'
Vicky
Tuesday, 22 December 2009
2nd for the Day...

 This has been done for a very special person, but as yet I haven't given it to her. I know for a fact she doesn't come onto the blog, so am safe to show it. I have yet to stamp the notes!
Supplies -
Stamp Set - Fifth Avenue
Cardstock - Pacific Point, Very Vanilla
DSP - Urban Garden
Ink - Kiwi Kiss, Pacific Point
Ribbon - Bashful Blue Grosgrain
Accessories - Snail Adhesive, Dimensionals, Bone Folder
I will post a Tutorial later on next week so that if any of you want to have a go at making them, you are able to. Very easy project!
Happy Stampin'
Vicky


Challenge - TSSC101
Hello Stampers,
I have finally manged to get home - for a couple of hours - chasing up stuff, etc & then on my way again!
I did this challenge late last night when it come through. Not exacly what I had planed but still I am happy with it - maybe????

Card Sample

Supplies -
Stamp Set - Always
Cardstock - Whisper White, Pink Pirouette, Riding Hood Red
DSP - Walk in the Park - Retired
Ink - Pink Pirouette, Going Gray
Punches - 1 3/8" Circle, 1 1/4" Circle, 1/2" Circle
Accessories - Snail Adhesive, Dimensionals, Pretties Kit
All in all this turned out to be a very easy 5 minute card, ie once I knew what colours I was going to use. I have just realised that the DSP is not current, although it can always be replaced with one of the lovely current Designer Papers.
To lift the card a little, I added the small gray flower inside the "Always".
It looked a little dull prior to that & I didn't want to used Dazzling Diamonds. I seem to be overloading on that stuff at the moment!
To lift the card a little, I added the small gray flower inside the "Always".
It looked a little dull prior to that & I didn't want to used Dazzling Diamonds. I seem to be overloading on that stuff at the moment!
I have tried to vere away from the traditional colours of Valentine - to a certain extent I have!
Until next time, Happy Stampin'
Vicky
Monday, 14 December 2009
Bulldog Clips...
This is the little project I did from the left over bits & pieces of the cards I did for the challenges....

I have all my clips covered in all sorts different colour papers, deisgns, ribbons, buttons, rhinestones or whatever I put my hand on at the time. Gives them an individual look, instead of the dull boring black that we get all time.
Very quick & very easy!
I have others that I have made, but they belong to little gifts that all match in.
Over the next couple of days I will post the small gift sets etc for you to check out!
Short post today! Have a great night!
Vicky
Sunday, 13 December 2009
Challenge SSC129...
Heya Stampers,
I have just completed a challenge & thought I would show you my end results. In fact I made 2 cards using the same sketch, except I turned one to the side. As soon as I saw the sketch, I knew what stamp set I wanted to use, but had no idea of colours until I matched the colours with the patterened paper!

Card 1

Supplies -
Stamp Set - Circle Circus, Short & Sweet
Cardstock - Very Vanilla, Not Quiet Navy
DSP - Kiwi Kiss
Ink - Garden Green
Punches - Oval, 1" Circle, 1 3/8" Circle, 3/4" Circle
Rhinestone Brads - Green - Small & Large
Accessories - Snail Adhesive, Dimensionals
Card 2

Supplies -
Stamp Set - Circle Circus, Short & Sweet
Cardstock - Very Vanilla, Not Quiet Navy, So Saffron
DSP - Pacific Point
Ink - Not Quite Navy
Punches - Oval, 1" Circle, 1 3/8" Circle, 3/4" Circle, 1 1/4' Circle
Accessories - Pearls from the Pretties Kit - Small & Large, Snail Adhesive, Dimensionals
When I saw this DSP in the catalogue, I didn't much go for it, but after working with it & seeing the end result, I LOVE it!
Why not have a go at the sketch yourself & have a bit of fun at the same time!
Tomorrow I will show you what I did with some of the left over cardstock & paper!
Tomorrow I will show you what I did with some of the left over cardstock & paper!
Vicky
Wednesday, 9 December 2009
5 Minute Card
Hello World!
It is a couple of days since my last posting, but I have been in Brissie & now trying to organise myself for a new street market the local council are starting for the Christmas Holidays!
After not doing any markets for over 4 years, I forgot how much prep is required, but I am slowly getting there - I think, maybe! Anyhow, who says I can't panic at the last moment!
This is a card I did some time ago, but thought I would post it to give you all a look-see!

Supplies -
Cardstock - Perfect Plum, Certainly Celery, Very Vanilla
Stamp Set - Embrace Life
Ink - Perfect Plum
Accessories - Snail Adhesive
Ribbon - Non-SU
Instructions -
Stamp the flower randomly onto the 2nd layer - Certainly Celery
Cut the3rd layer - Very Vanilla - into 3 equal pieces
Using Perfect Plum Stamp Pad, stamp leaves onto each piece of the 3 pieces of Very Vanilla, ensuring they are in the middle of each piece
Tie Ribbon around the bottom of a piece of Very Vanilla Cardstock
Leaving a small edge around the Very Vanilla & allowing Certainly Celery to show through adhere to middle of 2nd layer
Adhere the other 2 pieces to either side of the middle piece
Leaving a small edge, adhere the 2nd layer - Certainly Celery - to the top of the Card - Perfect Plum
Done!

If you don't understand the tutorial, please do not hesitate to email me & I will only be too happy to explain
Happy Stampin'
Vicky
It is a couple of days since my last posting, but I have been in Brissie & now trying to organise myself for a new street market the local council are starting for the Christmas Holidays!
After not doing any markets for over 4 years, I forgot how much prep is required, but I am slowly getting there - I think, maybe! Anyhow, who says I can't panic at the last moment!
This is a card I did some time ago, but thought I would post it to give you all a look-see!

Cardstock - Perfect Plum, Certainly Celery, Very Vanilla
Stamp Set - Embrace Life
Ink - Perfect Plum
Accessories - Snail Adhesive
Ribbon - Non-SU
Instructions -
Stamp the flower randomly onto the 2nd layer - Certainly Celery
Cut the3rd layer - Very Vanilla - into 3 equal pieces
Using Perfect Plum Stamp Pad, stamp leaves onto each piece of the 3 pieces of Very Vanilla, ensuring they are in the middle of each piece
Tie Ribbon around the bottom of a piece of Very Vanilla Cardstock
Leaving a small edge around the Very Vanilla & allowing Certainly Celery to show through adhere to middle of 2nd layer
Adhere the other 2 pieces to either side of the middle piece
Leaving a small edge, adhere the 2nd layer - Certainly Celery - to the top of the Card - Perfect Plum
Done!

Happy Stampin'
Vicky
Sunday, 6 December 2009
Onsie...
This is a little project we did at a get together with a group of friends sometime last year.


Supplies -
Cardstock - Barely Banana, Whisper White
Ink - Barely Banana
Stamp Set - Wild About You
Accessories - Scallop Oval Punch, Dazzling Diamonds, Mat Pack, Black Marker, Dimensionals, Ribbon
Enjoy & Happy Stampin!
Vicky
Tutorial...
I have finally managed to do tutorial for the "Rock 'n' Roll" method I used on the butterfly below.
Using 2 ink colours, this technique adds extra dimension to your solid stamped images
Instructions for Rock ‘n’ Roll
Supplies Required –
.JPG)
Cardstock – Very Vanilla, Punpkin Pie
DSP – Non-SU
Ink – Bashful Blue, Chocolate Chip
Stamp Set – Great Friend
Punches – 1 3/8” Circle, 1 ¼” Circle
Accessories - Dazzling Diamonds, 2-Way Glue, Rhinestones – Non-SU, Acetate, Dimensionals
Instructions –
1. Using the Bashful Blue ink pad (lighter colour), ink your image
2. Using your same image, ink the edges with the Chocolate Chip (darker colour) by rolling the edges of the stamp onto the ink pad
3. If done properly, the darker coloured ink should appear around the outer edges of the stamp, while the lighter colour ink will still be showing on the inside
4. Stamp your image onto your cardstock
5. If required, repeat above steps
6. Using scissors, cut around stamped image
7. Complete your project
TIP –
1. Prior to stamping the image onto my card, I will sometimes blow onto the stamp so as to moisten the ink a little. This ensures that this ink is still moist
2. Practice on a scrap piece of cardstock or paper until such time as you are happy with your result
Until next time when I will post instructions for the Note Book!
Vicky
Using 2 ink colours, this technique adds extra dimension to your solid stamped images
Instructions for Rock ‘n’ Roll
Supplies Required –
.JPG)
DSP – Non-SU
Ink – Bashful Blue, Chocolate Chip
Stamp Set – Great Friend
Punches – 1 3/8” Circle, 1 ¼” Circle
Accessories - Dazzling Diamonds, 2-Way Glue, Rhinestones – Non-SU, Acetate, Dimensionals
Instructions –
1. Using the Bashful Blue ink pad (lighter colour), ink your image
2. Using your same image, ink the edges with the Chocolate Chip (darker colour) by rolling the edges of the stamp onto the ink pad
3. If done properly, the darker coloured ink should appear around the outer edges of the stamp, while the lighter colour ink will still be showing on the inside
4. Stamp your image onto your cardstock
5. If required, repeat above steps
6. Using scissors, cut around stamped image
7. Complete your project
TIP –
1. Prior to stamping the image onto my card, I will sometimes blow onto the stamp so as to moisten the ink a little. This ensures that this ink is still moist
2. Practice on a scrap piece of cardstock or paper until such time as you are happy with your result
Until next time when I will post instructions for the Note Book!
Vicky
Challenge #1
Good Morning All,
I have just completed my first Challenge - yahooooooooooo!.
I only hope I did it right, as usual I tend to confuse myself. I just like to grab a colour cardstock & then work on the other colours that will match, but I think it come up ok. It could be my one & only, who knows!
I do know that I wanted to purposely stay away from the traditional colours of Red, Black & White!
I do know that I wanted to purposely stay away from the traditional colours of Red, Black & White!


Challenge # 3 - Hugs & Kisses
After combining all 3 together -
THE RESULT...

Supplies -
Cardstock - Not Quite Navy, Close to Cocoa, Bashful Blue
DSP - Bella Bleu
Ink - Not Quiet Navy, Close to Coca, Bashful Blue
Punches - 1 14" Round, 1 3/8" Circle
Punches - 1 14" Round, 1 3/8" Circle
Accessories - Dazzling Diamonds, Dimensionals, Snail Adhesive
Let me know what you think?


Vicky
Saturday, 5 December 2009
Summer has Sprung....

As from 1 December, the new Summer Mini is with us!
Once again, this mini is full of lovely stamps, co-ordinating punches, rub-ons, papers, buttons, hardware, cards & envelopes plus accessories
- including crocheted flowers for that extra special touch to your project
- including crocheted flowers for that extra special touch to your project
I have mini-catalogues on order & awaiting delivery, but in the meantime, please click onto the mini - right hand side. Once there, you will be able to browse the many great items.
To order, just contact e via email, fax or post!
Included in the Mini is the great Circle Scissor Plus @ $54.95 & the Glass Mat @ $37.95
To order, just contact e via email, fax or post!
Included in the Mini is the great Circle Scissor Plus @ $54.95 & the Glass Mat @ $37.95
Enjoy
Vicky
Note...
Hi All,
I have realised that I didn't allow for the acetate step in my tutorial. This is only because I am wanting my cellephone bag to pop up through the hole with a ribbon & tag tied to it.
But if you would your box to have the acetate in it - please check below, as I have now included the step
Enjoy
Vicky
Friday, 4 December 2009
Box with Acetate Window...
Box with Acetate Window
Supplies –
1 x piece cardstock - 6 ¼” x 6 ¼” square
1 x piece DSP – 4 5/8” x 4 5/8” square
Scallop Circle Punch
1 3/8” Circle Punch
1 ¼” Circle Punch
Bone Folder
Sticky Strip
Dimensionals
Paper Cutter
Scissors
Box
1 Score the 6 ¼” x 6 ¼” square cardstock at 2” & 4 ¼”
2 Rotate & repeat

3 Using your scissors, cut along 2 score lines on opposite sides of the cardstock
4 Trim ½” off top of the 4 outer squares
5 Cut a “V” into the inside corner of each of the pieces & again for the outside

6 Using Sticky Strip and with the right side facing you, adhere the sides to the inside of box

Lid
1. Score the 4 5/8” x 4 5/8” square cardstock at 1” all around the lid
2. Rotate & repeat

3. Using your scissors, cut along 2 score lines on opposite sides of the cardstock
4. Trim ½” off top of the 4 outer squares
5. Cut a “V” into the inside corner of each of the pieces & again for the outside

6. Using 1 ¼´Circle Punch, punch the middle out of the top of the lid


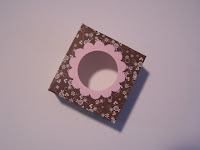

7. With a scrap piece of cardstock, and using 1 ¼” Circle Punch, punch out a circle
8. Using the 1 3/8" circle punch, punch out a piece of acetate
9. Using the Scallop Punch, place over the circle, ensuring that it is even all around, punch
10. Adhere the acetate to the wrong side of the scallop piece
11. Adhere scallop piece over the top of the circle
12. Using Sticky Strip and with the right side facing you, adhere the sides to the inside of box
13. Place lid over the bottom & embellish
I hope you enjoy this tutorial. It is the 1st one I have completed with photos, as I didn't know if I could make myself clear enough without them.
If anyone has any problems understanding, please do not hesitate to contact me
Until tmw, when I will do one for the card!
Vicky
Subscribe to:
Posts (Atom)