Sunday, 30 October 2011

SC 014/11...

Where does the time go - the weeks just seem to fly by & before we know it - another week, another new challenge.  Yep, Sunny Challenges & Creations has a new sketch, so head on over to check it & the other entries.

This week, the sketch has been set by Kris & of course, the 2nd part of the challenge is to use the colours of - Melon Mambo, Tempting Turquoise & Daffodil Delight.  I will admit that I had a hard time using Tempting Turquoise, so I played it safe & added just a touch.  I think I may have pulled it off!

Measurements -
Base Card - Whisper White - 5 7/8" x 8 1/4" or 15cm x 21cm - scored & folded in half
Layer 1 - Melon Mambo - 5 1/2" x 2 1/4" or 14cm x 5.5cm
Layer 2 - Whisper White - 5 3/8" x 1 3/4" or 13.5cm x 4.45cm
Layer 3 - Daffodil Delight - 2 1/2" x 2 1/2" or 6.5cm x 6.5cm
Layer 4 - Whisper White - 2 3/8" x 2 3/8" or 6cm x 6cm

With my Eyelet Border Punch, I punched along one long edge of Melon Mambo & adhered this to the Base Card using Snail Adhesive.  I stamped my sentiment onto the piece of Whisper White using Tempting Turquoise Ink prior to running it through the Bigshot with the Embossing Folder - Perfect Polka Dots.


I adhered to 2 flowers together & punched 2 holes in the middle of the smallest with my Handheld 1/16" Circle Punch.  I threaded 2 pieces of Taffeta Ribbon threw both holes, adhered across the Embossed Whisper White, tucked ends under, tied a bow on top of the flowers & adhered to the piece of Melon Mambo.

I stamped my images onto the smaller piece of Whisper White using Melon Mambo Ink, run through the Bigshot, again using Embossing Folder - Perfect Polka Dots & adhered to the piece of Daffodil Delight.  This piece was adhered to the Base Card using SU Dimensionals, as I wanted it to stand away from the card a little. 

I again adhered 2 different size flowers together & placed a Tempting Turquoise Brad in the middle & placed on the card with a SU Dimensional.

All in all a very simple card, but a clean & simple one (CAS). 

Supplies -
Stamp Set - Short & Sweet, Pocket Silhouettes
Ink - Melon Mambo, Tempting Turquoise, Daffodil Delight
Cardstock - Whisper White, Daffodil Delight, Melon Mambo
Embossing Folder - Perfect Polka Dots
Punches - Eyelet Border, 1/16" Handheld Circle
Ribbon - 1/8" Taffeta - Daffodil Delight
Accessories - Snail Adhesive, Tombow Glue, SU Dimensionals,
Brights Brads - Tempting Turquoise, Flowers


Now, head over to Sunny Challenges & Creations & check out what Kris & Gwen have created, go create your entry, come back & link to Mr Linky.  You could be the next Ray of Sunshine.

Until next time, Enjoy!

Friday, 28 October 2011

Pyramid Card Tutorial...

After receiving a number of emails from different stampers asking for the measurements for the Pyramid card I created Here I have finally finished them.  I only hope they make sense & you are able to understand.

In fact I created another card very similar to the one linked above.  The measurements have been made to fit an Australian Standard Envelope.

Please excuse the photos as they were taken at night when the light was not the best!
 
Supplies –

Stamp Set – Create a Cupcake, Pennant Parade
Ink – Early Expresso, Poppy Parade
Cardstock – Early Expresso, Whisper White, So Saffron, Poppy Parade
DSP – Just Add Cake
Punches – Cupcake Builder, Petite Pennants Builder, Scallop Oval,
Large Oval, Scallop Circle, 1 3/8” Circle, 1 ¼” Circle
Accessories – Snail Adhesive, SU Dimensionals, Crystal Effects

Measurements -
2 x Poppy Parade Cardstock – 4 ¼” x 4 ¼” or 11cm x 11cm
1 x Early Expresso Cardstock – 4 ¼” x 4 ¼” or 11cm x 11cm
1 x So Saffron – 4 1/8” x 4 1/8” or 10.5cm x 10.5cm – cut in half from point to point – gives you 2 triangles - you will only require 1 triangle, save the 2nd for another card
1 x DSP – 4” x 4” 0r 10cm x 10cm - cut in half from point to point – gives you 2 triangles - you will only require 1 triangle, save the 2nd for another card
1 x Whisper White Cardstock – 8” x 4 1/8” or 20.5cm x 10.5cm

Directions –
Front –
1. Score & fold each piece of Poppy Parade & Early Expresso Cardstocks in half from corner to corner – creates a triangle
2. Unfold

3. Place 2 pieces - Poppy Parade - side by side so that the fold begins from the centre – where the 2 cards meet – out towards the lower outside edges
4. Place the 3rd piece – Early Expresso – so that the fold runs along the join of the 2 pieces of Poppy Parade

5. Adhere Early Expresso Cardstock so that the right side is over the square on the right & the left side is under the square on the left
6. Take 1 triangle of So Saffron Cardstock & adhere to Early Expresso Cardstock
7. Take 1 triangle of DSP & adhere to So Saffron Cardstock


8. Embellish & complete front of card


Inside –
9. Taking the piece of Whisper White Cardstock, score down the middle
10. With a pencil, draw a line from the top centre score to the bottom of the corner – both sides


11. Cut along both these lines – you will have a triangle


12. Erase pencil lines – if any
13. Decorate & embellish inside card
14. Adhere to inside of card using Snail Adhesive


15. Apply 3 SU Dimensionals to the inside of card – this allows you to open & close your card


Congratulations, you have completed your Pyramid Card!

Please feel free to email me if you do not understand any part of the tutorial.

Until next time, Enjoy!

Sunday, 23 October 2011

SC 013/11...

Crikey, can you believe it!!!!!  This is week 13 of our challenge - time does fly when you're having fun.

This week, the challenge was brought to you by our own Gwen & boy, has she made it very easy for us  - NO 2nd part of the challenge!!!!!  Yep, you read right - NO 2nd part of the challenge!!!!  In other words, you have a free hand on what you create as long as you stick basically to the sketch!!!!!!

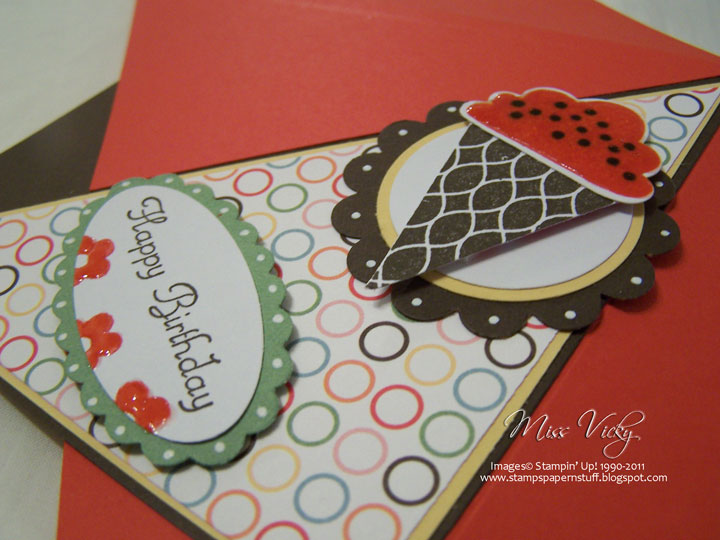
Now, my mind went into overdrive & had so many ideas, but this is the one I ended up going with, as when I first saw the sketch, a kid's birthday card popped into my head.  This card can be used for boy/girl!!!!

To check out my 2nd card, pop back in later on in the week!

Base Card - Poppy Parade - 8 1/4" x 5 7/8" or 21cm x 15cm - Scored & folded in half landscape
Layer 1 - Whisper White - 4" x 5 3/4" or 10cm x 14.5cm
Layer 2 - DSP - 3 7/8" x 5 5/8" or 9.5cm x 14cm
Layer 3 - Poppy Parade - 4" x 2 3/8" or 10cm x 6cm
Layer 4 - DSP - 3 7/8" x 2 1/4" or 9.5cm x 5.5cm

I layered my DSP onto Whisper White Cardstock & then onto the Base Card - Poppy Parade, using Snail Adhesive.  I layered the smaller piece of DSP onto the piece of Poppy Parade Cardstock, then onto the middle of the Base Card with Snail Adhesive.

I punched a piece of Whisper White Cardstock with my Scallop Circle Punch & layered a piece of Wild Wasabi Cardstock onto it.  This piece had been punched with the 1 3/8" Circle Punch.  I punched a So Saffron circle from my 1 1/4" Circle Punch & adhered to the top of Wild Wasabi circle.

With Envelope...

With my Early Expresso Ink, I stamped the bottom of the cupcake, while the top was stamped using So Saffron Ink.  I punched both pieces with my Cupcake Builder Punch, stamped over the So Saffron top with Early Expresso Ink - this put the "chips" onto the "icing" & adhered this piece to the top of the cupcake bottom with Snail Adhesive.  I drew dots around the circle with my SU Marker - Early Expresso & adhered the whole cupcake to the So Saffron Circle with Su Dimensionals.

I stamped the greeting in Early Expresso Ink onto a scrap of Whisper White Cardstock, cut around it ensuring I allowed enough card at both ends of the greeting, one end to slide under the Scalloped Circle, while the other end, I snipped a "V" into it.  I then used my scissors to shape the pennant & adhered the left hand end to the card with Snail Adhesive.

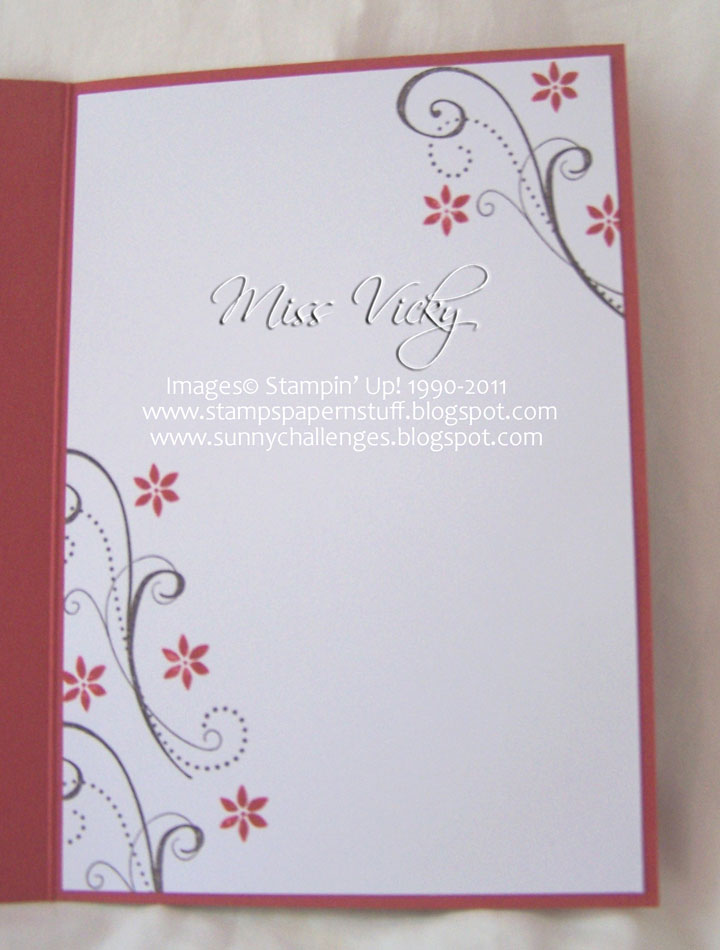
For something a little different, I decided to have another cupcake for the inside, but I wanted it to pop up when opened.  For this, I cut a piece of Whisper White Cardstock 4" x 5 3/4" or 10cm x 14.5cm, measured the middle along the long side & marked with a pencil.  To get the bit to stand, I measured 1/8" or 3mm either side of the halfway mark.  I then drew a line on both sides about 1 1/8" or 2.5cm down, scored across the bottom to where both sides meet & cut along the lines to the score mark.

Inside - Pop Up Cupcake...

I again stamped my images using Early Expresso & So Saffron Inks onto Whisper White Cardstock, punched using my Cupcake Builder Punch & adhered to the piece with Snail Adhesive.  I punched the cherry from DSP with the same punch.  I inked my wording with my SU Marker - Poppy Parade & stamped in the middle. 

For the bottom half, I cut a strip of DSP, adhered to a piece of Early Expresso Cardstock, then to the Whisper White Cardstock, allowing a small edge of the White to show at the bottom.

All in all a very simple card but with a bit of a WOW, I think!!!!!  I would relly like to know what you think?

Supplies -
Stamp Set - Create a Cupcake, A Word for You
Ink - Early Expresso, So Saffron
Cardstock - Whisper White, Poppy Parade, Wild Wasabi
DSP - Just Add Cake
Punches - 1 3/8" Circle, 1 1/4" Circle, Scallop Circle, Cupcake Builder
Accessories - SU Dimensionals, Snail Adhesive, SU Markers - Early Expresso & Poppy Parade


Don't forget to hop over to Sunny Challenges & Creations to check out what Gwen & Kris have created using the same sketch.  While there, create your own card, link it to your blog or online group.forum with Mr Linky.  Both Mr Linky & ourselves would really love to see your creation.  Who knows, you could be our next "Ray of Sunshine".

Until next time, Enjoy!


Friday, 21 October 2011

Pyramid Card...

Inside Card...
First up I must aplogise for not having the measurements for you in this post, but if anyone is wanting them, please email me.  I really have to think what I actually used here....

I did this card sometime ago - early September to be exact & did make it with a little boy in mind, but ended up sending it off to my uncle.  He turned 81!!!  He is always stirring me, so I thought this would be a great way to get one up on him.....  He thought it fantastic, but the best part, the great-grandkids loved it!!!!!!

After adhering the base card together using Wild Wasabi & So Saffron Cardstocks, I adhered DSP onto Early Expresso then onto the So Saffron.  This formed the front of the card.

Using my Scallop Circle Punch, I punched a circle with Early Expresso, adhered a circle of Wild Wasabi Cardstock to the top which had been punched using the 1 1/4" Circle Punch.  I punched another piece of Cardstock in Whisper White with the 1 3/8" Circle Punch & adhered to the top of the Wild Wasabi circle.


Envelope...
I stamped my image onto Whisper White Cardstock using Early Expresso Ink,punched the image with the new Petite Pennants Builder Punch & adhered to the circle with Snail Adhesive.  I stamped the top onto Whisper White using So Saffron Ink, cut it out, dotted some dots using my SU Marker - Early Expresso, placed white gel dots around the scallop with my Gel Pen & adhered to the top of the cone with SU Dimensionals.  The whole scallop circle was adhered to the card with SU Dimensionals. 
For my greeting, I stamped onto Whisper White Cardstock in Early Expresso Ink, punched it out with the Large Oval Punch & adhered to a piece of Baja Breeze which had been punched with the Scallop Oval Punch.  I again placed white gel dots around the scallop with my Gel Pen & adhered to the bottom of the card with SU Dimensionals.

As I wanted the card to be flat for posting, instead of gluing all sides together, I left one side open & placed 3 SU Dimensionals to the inside of the card.

Supplies -
Stamp Set - Create a Cupcake, Pennant Parade
Ink - Early Expresso, So Saffron
Cardstock - Whisper White, So Saffron, Baja Breeze, Wild Wasabi
DSP - Just Add Cake
Punches - Scallop Circle, Scallop Oval, 1 1/4" Circle, 1 3/8" Circle,
Large Scallop, Petite Pennants Builder
Accessories - SU Dimensionals, Snail Adhesive, White Gel Pen,
SU Marker - Early Expresso


Until next time, Enjoy!

Very Merry...

Another Xmas card you ask????  Well, it is getting close to that time of the year & me being me, I like to have my cards in the mail the first week in December.

Inside...

The layout for this card has been around the blog world for some time, so I have to say it is not my idea, but a combination of many cards & layouts I've seen over time.  I love both stamp sets I've used on this card, so very versatile without being over the top.

Again, I've created a non-traditional card.  Gotta love non-tradition.....

Base Card - Early Expresso - 8 1/4" x 4 1/4" or 21cm x 10.5cm - Scored & folded in half longways
Layer 1 - Blushing Bride - 5 3/4 x 4" or  14.5cm x 10cm
Layer 2 - Whisper White - 5 5/8" x 3 7/8" or 14cm x 9.5cm
Layer 3 - DSP - 5 1/2" x 3 3/4" or 13.5cm x 9cm
Layer 4 - Early Exresso - 3 1/4" x 2 1/4" or 8cm x 5.5cm
Layer 5 - Whisper White - 3 1/8" x 2 1/8" or 7.5cm x 5cm

I cut my DSP into 3 pieces, being careful that I didn't mix the sections so that I knew which order they would be adhered to the card.  I actually didn't want them all to be the same size, but the 1st & 2nd are.....

These pieces were adhered to Whisper White leaving a small border of Whisper White around each piece, then to Blushing Bride using Snail Ahesive.

Envelope...
I stamped 3 images onto the smaller piece of Whisper White using Old Olive & Blushing Bride Inks.  I drew the lines at the top of the images with my SU Markers - Old Olive & Blushing Bride.  I adhered this piece to the top of the DSP with Snail Adhesive.

I stamped my greeting onto Whisper White scrap piece with Early Expresso Ink, punched it out with my Small Oval Punch & adhered to a piece of Early Expresso which had been punched using Large Oval Punch.

I punched a hole in either side of the ovals, run ribbon through them & across the card, tucked my ends under & adhered the whole piece to the Base Card - Early Expresso.

To pop the card a little, I applied Basic Rhinestones to the images & to the ribbon at the greeting.

Supplies -
Stamp Set - Short & Sweet, Tree Trimmings
Ink - Early Expresso, Blushing Bride, Old Olive
Cardstock - Whisper White, Early Expresso, Blushing Bride
DSP - Letters to Santa 
Punches - Small Oval, Large Oval
Ribbon - 1/8" Taffeta - Early Expresso
Accessories - Snail Adhesive, Basic Rhinestones, SU Markers


Until next time, Enjoy!

Thursday, 20 October 2011

SC012/11...

This card has been created for the challenge over at Sunny Challenges & Creations  It is not too late to link your creation.  You have until Saturday arvo, so why not have some fun & have a go!  You could be our "Ray of Sunshine"

For the inspiration of this card, I actually saw a dress in a shop window yesterday using these colours.  Amazing where your inspiration comes from.

The measurements for my card will make it easier for you.  Along with the sketch, don't forget to use flowers on your card.

Base Card - Crumb Cake - 8 1/4" x 5 7/8" or 21cm x 15cm - score @ 4 1/8" or 10.47cm & fold in half
Layer 1 - Cherry Cobbler - 5 3/4" x 4" or 14.5cm x 10cm
Layer 2 - Very Vanilla - 5 5/8" x 4 1/8" or 14xm x 10.5cm
Layer 3 - Crumb Cake - 4" x 1 1/4" or 10cm x 3cm
Layer 4 - Very Vanilla - 4" x 1 1/4" or 10cm x 3cm

I stamped my background mage onto Very Vanilla using Crumb Cake Ink - I didn't stamp off.  I stamped over the stop with another image using Cherry Cobbler Ink.

I cut this stamped piece at 1" & 1 1/4" which gave me 2 x 1" pieces & 1 x 1 1/4".  I adhered these pieces onto the piece of Cherry Cobbler & then to the Base Card - Crumb Cake, ensuring the larger piece went into the middle & smaller pieces either side.

With my Eyelet Border Punch, I punched the longer side of the piece of Crumb Cake Cardstock, stamped my sentiment with Cherry Cobbler Ink onto Very Vanilla piece & run it through the Bigshot using the Embossing Folder - Perfect Polka Dots.

Using a sponge, Cherry Cobbler Ink & a piece of White Taffeta Ribbon, I sponged the ribbon until it was the colour I wanted, let dry, adhered to the Embossed Very Vanilla Cardstock, tucked ends under, adhered to the punched piece of Crumb Cake & finally to the Base Card.

I punched 3 flowers with one of the punches from the Itty Bitty Set, adhered them to the Very Vanilla Embossed Cardstock & adhered a Basic Pearl on each.

Lastly, I adhered butterflies to the top of the card after they had been cut from the Bigshot & Embosslit Die.  I applied Basic Pearls to the butterflies & to the flowers.

Supplies -
Stamp Set - Medallion, Just Believe
Ink - Cherry Cobbler, Crumb Cake
Cardstock - Crumb Cake, Very Vanilla, Cherry Cobbler
Punches - Eyelet Border, Itty Bitty Set
Ribbon - 1/8" Taffeta - White
Embossing Folders - Perfect Polka Dots
Embosslit Dies - Beautiful Wings
Accessories - Snail Adhesive, Sponge, Basic Pearls


Until next time, Enjoy!


Wednesday, 19 October 2011

A Tissue, A Tissue...

...  I have seen these Tissue Boxes around the blog world & thought it about time I tired my hand at one. 

I created a basic template using Pretty in Pink Cardstock.  After glueing my pieces together, I cut 4 pieces of DSP slightly smaller than the actual box, so that I still had a small edge of coloured Cardstock showing around the edges & adhered to the sides of the box.  I then adhered the final edges together to form the box.

Using the Scallop Trim Border, I punched along one edge of a strip of Pumpkin Pie Cardstock & adhered to the bottom of the box.

I cut a round circle in the top of the lid with my Bigshot & Circles Die, cut & adhered to form the top & sponged around the top edge & circle with Pretty in Pink Ink & a sponge. 

I again punched a strip of Pumpkin Pie Cardstock, punched along one side with the Scallop Trim Border Punch & adhered to along the bottom of the lid.  I adhered Brown ribbon over the top of the border going right around the lid.  I tied a double bow off to one side to finish the top off.

I adhered another piece of the same ribbon - a little narrower - around the middle of the box, cut 2 each of the same lace DSP, adhered them to the middle of the ribbon on all 4 sides using a Mini-Glue Dot & applied a Basic Pearl in the middle of each doiley.

Supplies -
Stamp Set - Nil
Ink - Pretty in Pink
Cardstock - Pretty in Pink, Pumpkin Pie
DSP - Flirtatious Speciality
Punches - Scallop Trim Border
Dies - Circles # 2
Accessories - Sticky Strip, Mini-Glue Dots, Tombow Glue, Basic Pearl, Bigshot, Sponge
Non-SU - Ribbon


Until next time, Enjoy!

Sunday, 16 October 2011

SC 012/11...

A new challenge is up & running over at Sunny Challenges & Creations

This week, it was my turn to set the challenge & with our challenges we don't just get the sketch, but a 2nd part too, that being Flowers, Flowers, Flowers.  How easy can it be!!!!  We all love making cards with flowers.  Let's face it - they are the easiest cards to make!

Now on with my card -

Base Card - Soft Suede - 8 1/4" x 5 7/8" or 21cm x 15cm - score @ 4 1/8" or 10.47cm & fold in half
Layer 1 - Pink Pirouette - 5 3/4" x 4" or 14.5cm x 10cm
Layer 2 - Very Vanilla - 5 5/8" x 4 1/8" or 14xm x 10.5cm
Layer 3 - Soft Suede - 4" x 1 1/4" or 10cm x 3cm
Layer 4 - DSP - 4" x 1 1/4" or 10cm x 3cm

Close Up of Embossing
Using my Embossing Buddy, I rubbed it over the piece of Very Vanilla, stamped my image onto Versamark & then Pink Pirouette Ink before stamping it onto the Very Vanilla Cardstock.  I poured Clear Embossing Powder over the image, tapped off excess & applied Dazzling Diamonds on top, tapped excess off & heat set with my Heat Tool.  You are not able to see the Dazzling Diamonds in the photo, but it does sparkle in real life. 

I cut this piece into 3 equal pieces & adhered to the piece of Pink Pirouette using my Snail Adhesive

I repeated the same technique for my senitment, except I used Soft Suede Ink.  This was stamped directly onto the piece of DSP.  I tore both sides of the DSP & adhered to the piece of Soft Suede Cardstock

Tip - When tearing DSP or Cardstock, ensure you tear it towards you.  This way you will get the torn section showing on your work 

Card Inside...

I adhered a piece of Ribbon along the bottom of the DSP, tied a bow, applied 3 Basic Pearls & adhered to the piece of Pink Pirouette Cardstock.

The Pink Pirouette Cardstock was then adhered to the Base Card - Soft Suede.

Wow, after reading this, it sort of come together really easy, but believe me, it took me a little longer to figure out what I was actually going to do for this sketch.

For my Inside, I again tore a piece of DSP, adhered to a piece of Soft Suede & then to Very Vanilla prior to adhering to inside of card.  I wanted a small piece of Very Vanilla showing at the bottom - see photo.  It broke the Soft Sude on Soft Suede.


Supplies -
Stamp Set - Elements of Style, So Happy for You
Ink - Pink Pirouette, Soft Suede, Versamark
Cardstock - Soft Suede, Pink Pirouette, Very Vanilla
DSP - Beau Chateau
Ribbon - 5/8" Taffeta - Very Vanilla
Accessories - Basic Pearls, Snail Adhesive, Heat Tool, Embossing Buddy,
Embossing Powder - Clear, Dazzling Diamonds


Why not hop over to Sunny Challenges & Creations & check out what Kris & Gwen have created, make your own creation, link back using Mr Linky. He would dearly love to walk you through the process of posting your creation.


Until next time, Enjoy!


Thursday, 13 October 2011

SC 011/11...

This is my card for the challenge over at Sunny Challenges & Creations  I am a little late in posting mine & have taken a couple of days off, & now that I have sort of finished all the stuff I had to do, decided to make a sample.

The challenge was set by Kris & not only did we have to go by the sketch but also use the stamp set "Season of Joy". 

Base Card - Riding Hood Red - 8 1/4" x 5 7/8" or 21cm x 15cm - score @ 4 1/8" or 10.47cm & fold in half
Layer 1 - Early Expresso - 5 3/4" x 4 1/4" or 14.5cm x 10.5cm
Layer 2 - Riding Hood Red - 4" x 3 3/4" or 10cm x 9.5cm
Layer 3 - DSP - 3 7/8" x 3 5/8" or 9.5cm x 9cm
Layer 4 - Riding Hood Red - 3 3/4" x 3 1/4" or 9.5cm x 8cm
Layer 5 - Whisper White - 3 5/8" x 3 1/8" or 9cm x 7.5cm
Layer 6 - Early Expresso - 2 7/8" x 2 3/8" or 7cm x 6cm
Layer 7 - Whisper White - 2 3/4" x 2 1/4" or 6.5cm x 5.5cm

I sort of made up by card as I went along.  In fact I started from the inside & worked my way out!  It happens this way a lot for me!

Using Riding Hood Red Ink, I stamped my image direct onto Whisper White Cardstock & adhered to a piece of Early Expresso Cardstock with my Snail Adhesive.

I run the piece of Whisper White Cardstock through the Bigspot & Embossing Folder - Petals a Plenty, coloured the middle of the flowers with my SU Marker - Riding Hood Red & adhered to a piece of Riding Hood Red Cardstock.  I thought this EF matched the stamp set perfectly.  This piece was adhered to a piece of Riding Hood Red Cardstock.

The DSP piece was adhered to a piece of Riding Hood Red & then adhered to the main piece of Early Expresso Cardstock.  I adhered all my separate pieces to this main piece, as per the sketch.  I wanted to tuck my ribbon ends under the main piece of Early Expresso Cardstock prior to adhering to the Base Card - Riding Hood Red.

To break the colours up a bit, I adhered Marina Mist Ribbon across the top of the card & tied a double bow-tie to the centre.  I applied small Basic Rhinestones to the flowers & snowflake in the stamped image.

Supplies -
Stamp Set - Sean of Joy
Ink - Riding Hood Red
Cardstock - Whisper White, Early Expresso, Riding Hood Red
DSP - Letters to Santa
Embossing Folder - Petals a Plenty
Ribbon - 1/8" Taffeta - Marina Mist
Accessories - Snail Adhesive, Bigshot, Basic Rhinestones


Why not hop over to Sunny Challenges & Creations & see what both Kris & Gwen have created, make your own creation, link back to the blog using Mr Linky.  He would dearly love to walk you through the process of posting your creation.

Until next time, Enjoy!

Friday, 7 October 2011

Xmas...

This is the card we made today at Crafty Creations.  All the ladies loved it & of course, the best part - even though we all had the same basic kit, everyone's card turned out so very different!

Base Card - Old Olive - 8 1/2" x 5 7/8" or 22cm x 15cm
Front -
Layer 1 - Blushing Bride - 5 3/4" x 2 1/8" or 14.5cm x 5.5cm
Layer 2 - DSP - 5 5/8" x 2 3/4" or 14cm x 5cm
Layer 3 - Old Olive - 3 1/2" x 2" or 8.5cm x 5cm
Layer 4 - Whisper White - 3 3/8" x 1 7/8" or 8cm x 4.5cm
LHS -
Layer 1 - Whisper White - 5 3/4" x 2 1/8" or 14.5cm x 5.5cm
RHS -
Layer 1 - Early Expresso - 5 3/4" x 4" or 14.5cm x 10cm
Layer 2 - DSP - 5 5/8" x 3 7/8" or 14cm x 9.5cm

Score along long edge of card at 2 1/4" & 4 1/4".  Fold at score lines.

Inside Card...

Front -
Using Snail Adhesive, I adhered DSP to Blushing Bride Cardstock, then to the Base Card - Old Olive.  I stamped random snowflake images onto Whisper White Cardstock using Early Expresso & Blushing Bride Inks.  I stamped the image to be cut out onto a scrap of Whisper White Cardstock using Old Olive Ink.  This was adhered to the piece of Whisper White Cardstock using SU Dimensionals.  I drew a line from the top of the card to the image with my SU Marker - Old Olive.

I adhered this piece to the Old Olive piece & then to the front of the card, ensuring that adhesive was only applied to half the piece.  I applied a Basic Pearl to the top of the trim.

Inside LHS -
I randomly stamped snowflake images onto a piece of Whisper White Cardstock using Blushing Bride & Early Expresso Inks.  With the Early Expresso images, I stamped off once prior to stamping onto the Whisper White, as I didn't want this colour to be too dark.  I then stamped a trim onto the Whisper White using Blushing Bride & drew a line from the top of the card to the top of the trim with my SU Marker - Old Olive.

I adhered this piece to the Base Card - Old Olive, as per photo.

Inside RHS -
I adhered the DSP to Early Expresso Cardstock & then to the Base Card - Old Olive.

Supplies -
Stamp Set - Tree Trimmings, Short & Sweet
Ink - Blushing Bride, Old Olive, Early Expresso
Cardstock - Old Olive, Blushing Bride, Early Expresso, Whisper White
DSP - Letters to Santa
Accessories - SU Markers - Old Olive, Snail Adhesive, SU Dimensionals, Basic Pearl


Until next time, have a great night!

Thursday, 6 October 2011

SSC 222...

It is so long since I've done a challenge from Stamping 411 that I saw this & was determined to get it finished on time.  I usually start & then don't have them completed in time.

Now, I must warn you, my card is a little different to what I usually make.  So, please don't say you haven't been warned!

As with the challenge, measurements are supplied -

Base 11 x 4 1/4", scored and folded in half at 5 1/2" - Early Expresso

Layer 2: 5 x 3 3/4" - Very Vanilla
Layer 3: 4 7/8" x 3 5/8" - Early Expresso
For layer 4, how about a ribbon or a piece of cardstock cut to 4 1/4" long - Ribbon
For the focal point you can use any shape that fits your stamps. Try cutting your cardstock the same size as your wood or clear mount block.

Close Up...

My oval was cut by running the Ovals Die through the Bigshot, stamped my image with Early Expresso Ink, applied Early Expresso Ink around the edge with my SU Sponge Dauber & adhered theborder by cutting a piece of  Very Vanilla Cardstock, punching along one edge of the cardstock with my Eyelet Border Punch, cutting & adhering to the back of the oval.

With the piece of Early Expresso Cardstock, I run this through the Bigshot with the Embossing Folder - Square Lattice, adhered a piece of Crocheted Trim along the LHS of the piece & adhered to Very Vanilla Cardstock.  This piece was adhered to the Base Card - Early Expresso.


Inside...

I tied a bow with the Crocheted Trim, placed a Vintage Brad to the middle & adhered to the card using a Mini Glue Dot.  I adhered the oval to the card with SU Dimensionals.

 Tip - Adhering bows to cards is a lot easier using Mini Glue Dots - they will stick heaps better

I must say these Vintage Brads are to die for & now keep asking myself why I had never used them previously?????  You get 4 each of 5 designs & all are to die for.
 
I love a lot of Vintage Cards that I see around the blog world, but am not really confident on making them myself, but I am quiet happy with the way this one turned out!  I hope you do too.


Supplies -
Stamp Set - Forever Young
Ink - Early Expresso
Cardstock - Very Vanilla, Early Expresso
Ribbon - Crochet Trim - Victoria
Embossing Folder - Square Lattice
Brads - Antique Brads
Punches - Eyelet Border
Dies - Ovals
Accessories - Snail Adhesive, SU Dimensionals, Mini Glue Dots,
SU Sponge Dauber, Bigshot
 
Until next time, Enjoy!


LinkWithin

Related Posts Plugin for WordPress, Blogger...