Showing posts with label Cards - Female. Show all posts

Sunday, 20 April 2014

Especially for You...

It seems like forever since my last post, but with the wedding season upon us, invitations & receptions have been taking up all my spare time.
 
Today's post is one I created a couple of weeks go & thought I would share with you.  It is a very easy layout but one that can be changed out to whatever you want using different stamps, colours & even DSP.
 
In fact, this card would make a perfect card for Mum, especially with Mother's Day just around the corner.
 
Measurements -
Base Card - Perfect Plum - 8 1/4" x 5 7/8" or 21cm x 10.5cm
Layer 1 - Sahara Sand - 5 3/4" x 4" or 14.5cm x 10cm
Layer 2 - Pink Pirouette - 5 5/8" x 3 7/8" or 14cm x 9.5cm
Layer 3 - 2 x Perfect Plum - 1/2" x 3 7/8" or 2cm x 9.5cm
Layer 4 - Very Vanilla - 1" x 3 7/8" or 2.5cm x 9.5cm
 
Supplies -
Stamp Set - Stippled Blossoms, Made for You
Ink - Perfect Plum, Pink Pirouette, Wild Wasabi, Pear Pizzazz
Cardstock - Pink Pirouette, Very Vanilla, Perfect Plum, Sahara Sand
Embossing Folder - Perfect Polka Dots
Punches - Dotted Scallop Ribbon Border
Accessories - Simply Scoring Tool, Stampin' Dimensionals, Snail Adhesive
 
Tutorial -
1.  Emboss bottom part of Pink Pirouette CS with Perfect Polka Dots EF
2.  Randomly score top part of CS using Simply Scoring Tool
3.  Punch 2 pieces of  Perfect Plum CS with Dotted Scallop Ribbon Border
4.  Stamp greeting/sentiment onto Very Vanilla CS with Perfect Plum Ink
5.  Adhere punched Perfect Plum pieces to bottom & top of Very Vanilla CS
6.  Cut 3 banners from scrap Sahara Sand & Perfect Plum CS prior to adhering to centre piece
7.  Adhere whole piece to embossed Pink Pirouette CS just above halfway
8.  Stamp Flower & Leaves onto scrap Very Vanilla CS using Pink Pirouette & Perfect Plum for rose & Wild Wasabi & Pear Pizzazz for leaves
9.  Cut out & adhere to card with Stampin' Dimensionals
 

  •  To order Stampin' Up! products online, please Shop Here
  • Want to join my family, and be a part of a group that loves to stamp together, Join Here
  • To check out available classes or to attend any of the classes, please Click Here, click on the "Classes/Workshop" Page or email me vickiawright@bigpond.com
Until next time, Happy Stampin'
 
Vicky

Friday, 31 January 2014

Feel Better Soon...

Today's card is one we will be creating in my Volunteer Class this afternoon. 
 
As with most of Friday's card, it has been CASEd (Copied & Shared Everything) from Pinterest.  L.O.V.E this site!  Thanks Vicki for your inspiration!
 
It does use one of my favourite retired stamp sets, but that is the beauty about my Volunteer Class - I get to play with some of my retired products again.  The card can easily be recreated with current products.
 
Supplies –
Stamp Set - Array of Sunshine – Retired, Express Yourself – 130339 (Hostess)
Ink - Calypso Coral – 126983, Lucky Limeade - Retired
Cardstock - Whisper White - 106549, Baja Breeze - Retired
Embossing F - Perfect Polka Dots - 117335
Accessories - Snail Adhesive – 104332, Stampin’ Dimensionals – 104430, Pearl Jewels - 119247, Glue Dots - 103683
 
Inside Card -
 
Card Front -
 
Tutorial on how to create card
 
 
  •  To order Stampin' Up! products online, please Shop Here
  • Want to join my family, and be a part of a group that loves to stamp together, Join Here
  • To check out available classes or to attend any of the classes, please Click Here, click on the "Classes/Workshop" Page or email me vickiawright@bigpond.com
Until next time, Happy Stampin'
 

Thursday, 23 January 2014

Having a Play...

... with the Circle Card Thinlits.  I've had them for some time, but was playing around the other day & decided to give them a bit of a workout!
 
If you haven't purchased these Thinlits, do so, as you will have so much fun doing so.  In fact, this is going to be a card for one of my Birthday next month.
 
Card Open -
 
Card Front -
 
It is a little different to my usual cards, so I would love to know what you think?
 
I will try & write a basic Tutorial for this card in the next couple of days & post for you. 
  •  To order Stampin' Up! products online, please Shop Here
  • Want to join my team and be a part of a group that loves to stamp together, Join Here
  • To check out available classes or to attend any of the classes, please Click Here, click on the "Classes/Workshop" Page or email me vickiawright@bigpond.com
Until next time, Happy Stampin'
  
 Vicky

Tuesday, 21 January 2014

Technique Classes...

Our classes for the new year are now back up & running.  It was great to catch up with everyone, have our normal "Show & Tell" & hear how everyone did at Christmas & New Year. 
 
To showcase some of the gorgeous SAB products you can earn this year, our 1st card was created using the DSP - Sweet Sorbet.  To earn FREE products during SAB, all you have to do is append over $90.00 excluding P&H.  SAB begins Tuesday, 28 January, but as a Demonstrator I get to pre-order.
 
To start the new year, we did a little bit of "Heat Embossing".  I like to go over techniques every now & then so that we can familiarise ourselves with them and it helps with the new crafters who have joined our group.

Supplies -
Stamp Set - Flower Shop - 130942, Express Yourself - 130339 (Hostess)
Ink - StazOn - 101406, VersaMark - 102283
Cardstock - Whisper White - 106549, Basic Black - 121688, Crisp Cantaloupe - 131303
DSP - Sweet Sorbet - 133521 (SAB 2014)
Ribbon - 3/8" Ruffle Stretch Rim - Crisp Cantaloupe
Punches - Pansy - 120698
Sizzlits - Little Leaves - 114511
Accessories - Glue Dots - 103683, Heat Tool - 129056, Embossing Powder - Pool Party - 129398, Pearl Basic Jewels - 119247

Inside Card -
 
Card Front -
  •  To order Stampin' Up! products online, please Shop Here
  • Want to join my family, and be a part of a group that loves to stamp together, Join Here
  • To check out available classes or to attend any of the classes, please Click Here, click on the "Classes/Workshop" Page or email me vickiawright@bigpond.com
Until next time, Happy Stampin'
 
Vicky


Tuesday, 14 January 2014

Birthday Wishes...

...with Sale-A-Bration!
 
As I've mentioned previously in a post a couple of days ago, the DSP for SAB this year are gorgeous & I can't seem to get enough of them.  Mind you, it did take me a little time & a lot of courage to cute into the pack, but now that I am, I can't stop using them.
 
Today's card is one I cased from Pinterest by Susan Harr.  I love that I can check this site out & find anything I want, especially when your mind is taking its time to get back into the creative mode from being on leave for a couple of weeks.  Casing cards will help you get into the creative zone again!
 
In fact, it is another one of my Birthday Cards I created for my birthdays this month. 
 
Supplies -
tamp Set - Flower Shop – 130942, Four You - 130538
Ink - Smokey Slate – 131179, Calypso Coral - 126983
Cardstock - Whisper White - 106549, Calypso Coral - 124392
DSP - Sweet Sorbet – 133521 (SAB 2014)
Embossing Folder - Decorative Dots – 133520 (SAB 2014)
Punches - Pansy - 130698
Ribbon - 3/4" Chevron – Calypso Coral – 130018
Accessories - Snail Adhesive – 104332, Stampin’ Dimensionals – 104430, Large Pearl Basic Jewels - 125577
 
Inside Card -
 
Card Front -
 
Click on the photo below to copy & paste or to save Tutorial
 
"Flower Shop"
Birthday Wishes


Sunday, 27 October 2013

SC 091/13...

For our challenges over at Sunny Challenges & Creations we have a simple sketch.  Sometimes, the simple challenges really challenge me & I have a hard time creating something.

I have not long received the cute little stamp set - Kind & Cozy & matching DSP - Gingham Garden, so I thought I would dig it out & ink it up before it become one of those sets that I love but never sees ink for a couple of months.

In keeping with the sketch, I kept my card very simple.  In fact, this card went off in the post during the week.

Inside -

 
Front -
 
We would love for you to play along with us this week.  You have 2 weeks to complete your creation.  All you have to do is head on over Sunny Challenges & Creations & check out what the other members of the Design Team & our Guest Designers have created. 
 
Tutorial to create your card.  Click on the link below to print


  •  To order Stampin' Up! products online, please Shop Here
  • Want to join my family, and be a part of a group that loves to stamp together, Join Here
  • To check out available classes or to attend any of the classes, please Click Here, click on the "Classes/Workshop" Page or email me vickiawright@bigpond.com

  • Until next time, Happy Stampin'
     
    Vicky

    Wednesday, 9 October 2013

    Technique Class # 2....

    Today's post is the 2nd card we created for our "Sunburst" Technique class.  You can see the 1st card one post back.

    I wanted to try a little something different when I was thinking about the 2nd card.  At first I wasn't too keen on the colours but hey with classes I find that it is best to try & step out of your comfort zone.  I try to create cards that will suit different people in the class & not just what I like.  The ladies love it, especially when they realise that I have used their favourite colours!!!!!

    Supplies -
    Stamp Set - Flower Shop - 130942
    Cardstock - Very Vanilla - 106550, Island Indigo - 124390, Pistachio Pudding - 130020, Soft Suede - 119982
    Ink - Crisp Cantaloupe - 131176
    DSP - Venetian Romance - 130144
    Embossing Folders - Perfect Polka Dots - 117335
    Punches - Pansy - 130698
    Framelits - Ovals Collections - 129381
    Embosslits - Beautiful Wings - 118138
    Sizzlits - Little Leaves - 114511
    Accessories - Big Shot - 113439, simply Scoring Tool - 122334, Trimmer - 129722, Snail Adhesive - 104332, Stampin' Dimensionals - 104430, Multipurpose Glue - 110755, Basic Pearls - 119247, Large Pearls - 125577


    "Sunburst" Technique
    •  To order Stampin' Up! products online, please Shop Here
    • Want to join my family, and be a part of a group that loves to stamp together, Join Here
    • To check out available classes or to attend any of the classes, please Click Here, click on the "Classes/Workshop" Page or email me vickiawright@bigpond.com
    Until next time, Happy Stampin'
     
    Vicky

    Sunday, 8 September 2013

    Swallowtail...

    In one of Technique Classes last month, we used the great stamp set "Swallowtail" & applied it to the technique - "Split Negative".

    I was really happy with the way this card turned out, as it is a little different to what I've seen using this technique.  I wanted to try a couple of non-traditional colours instead of the black & white that is usually the ones used for this technique.

    Today's card is one with a bit of a surprise inside.

    Supplies -
    Stamp Set - Swallowtail - 129216, Express Yourself (Hostess) - 129216, Papillon Potpourri - 123759
    Cardstock - Whisper White - 106549, Pink Pirouette - 116203, Always Artichoke - 108610, Window Sheets - 114323
    Ink - Pink Pirouette - 126956, Sahara Sand - 126976
    Punches - Modern Label - 119849, Word Window - 119857, Bitty Butterfly - 129406, Elegant Butterfly - 127526, Scallop Edge Border - 119882
    Dies - Top Note - 113463
    Embossing Folder - Perfect Polka Dots - 117335
    Accessories - Simply Scoring Tool - 122334, Pearls - 119247, Snail Adhesive - 104332, Sticky Strip - 104294, Stampin' Dimensionals - 104430

    The 2nd card will posted in a couple of days.
     
     
    •  To order Stampin' Up! products online, please Shop Here
    • Want to join my family, and be a part of a group that loves to stamp together, Join Here
    • To check out available classes or to attend any of the classes, please Click Here, click on the "Classes/Workshop" Page or email me vickiawright@bigpond.com
    Until next time, Happy Stampin'
     
    Vicky

    Monday, 2 September 2013

    SC 087/13...

    Our challenge over at Sunny Challenges & Creations has been set by Gwen.  For this challenge all we have to do is create a card, scrapbook page or 3-D item using our fantastic
     Framelits!

    I did a card very similar to this one some time ago for a one-on-one class.  I loved it so much, that decided to redo it, but had only ever half finished it.  So, while looking for supplies to create something for this challenge, I come across my half finished card & decided to finish it off.  Mind you, since I completed it, it went straight into the post, so I sort of have no measurements for you, but will give you a list & how I created it.

    To create my card, I cut an oval out of the middle of a piece of Whisper White using an Oval from the Ovals Collection, stamped the sentiment in Early Expresso Ink onto the Base Card - Whisper White.

    I then ran the Whisper White Piece which had the oval shape cut out through the Big Shot using the Fancy Fan Embossing Folder.  This piece was adhered to the Base Card with Snail Adhesive.

    I cut the oval border with the same size oval I had cut the middle plus the size bigger by placing the 2 inside each other onto a piece of Whisper White Cardstock & ran through the Big Shot.  This oval shape was then adhered to the outside of the Base Oval with Stampin' Dimensionals.

    I stamped 3 flower shapes from the Secret Garden Stamp Set in Blushing Bride, So Saffron & Soft Sky Inks.  These were then cut using the matching Secret Garden Framelits & attached to the card using Stampin' Dimensionals & Snail Adhesive. 

    The leaves were arranged on the card with Multipurpose Glue which had been cut from Pear Pizzazz Cardstock & the Little Leaves Sizzlits.  The little Butterfly was one I found in my So Saffron Cardstock & which had been cut from the Beautiful Wings Embosslits.

    Lastly to finish the card, I adhered Pearls to the centre of each flower, the middle of the Butterfly plus 5 Pearls to the opposite side of the frame.

    Supplies -
    Stamp Set - Secret Garden - 129144, Made for You (Retired)
    Ink - Blushing Bride - 131172, Soft Sky - 131181, So Saffron - 126957, Early Expresso - 126974
    Cardstock - Whisper White - 106549, Pear Pizzazz - 131290, Blushing Bride - 131287, So Saffron - 108611
    Embossing Folder - Fancy Fan - 127751
    Embosslits - Beautiful Wings - 118138
    Sizzlits - Little Leaves - 114511
    Framelits - Secret Garden - 129372, Ovals Collections - 129381
    Accessories - Pearls - 119247, Stampin' Dimensionals - 104430, Big Shot - 113439, Snail Adhesive - 104332

     
    I hope you will join us for this great challenge.
     
    Don't forget to pop on over to see what Gwen & Kris have created!
     
    Until next time, Happy Stampin!
     
    Vicky

    Sunday, 1 September 2013

    September Kits...

    ... are now up & available for purchase.  This month I have selected the very versatile stamp set
    "By the Tide"
     
    This is a great set for both males & females.  The cards this month could be used for either!  I've also used the "Brights" Colour Family & Marina Mist from the "Subtle" Family.  Lets face it, how can you not use a blue with a nautical theme!

     To purchase your kit, all you have to do is click on Pre-Cut Kits & it will take you straight to the page where you will see the PayPal Drop Down Button.  Once your kits have been posted, you will then receive your PDF Tutorial via email.
     
    •  To order Stampin' Up! products online, please Shop Here
    • Want to join my family, and be a part of a group that loves to stamp together, Join Here
    • To check out available classes or to attend any of the classes, please Click Here, click on the "Classes/Workshop" Page or email me vickiawright@bigpond.com
    Until next time, Happy Stampin'
     
    Vicky

    Friday, 30 August 2013

    Friday's Case.....

    ... is one I found on Pinterest & also the one we created in Crafty Creations this afternoon.
     
    I finally managed to dig out some of the gorgeous new DSP from the new Catalogue - Venetian Romance.  Along with the new DSP, I used Papaya Collage to finish my card off.

    The ladies in the class used retired DSP along with a retired Stamp Set.

    Supplies –
    Stamp Set              Papaya Collage – 126612, Express Yourself (Hostess) - 130339
    Ink                           Island Indigo – 126986, Soft Suede – 126978, Pistachio Pudding - 131177
    Cardstock              Crisp Cantaloupe – 131303, Very Vanilla – 106550, Soft Suede - 119982
    DSP                         Venetian Romance - 130144
    Ribbon                   5/8” Crochet Trim – Victoria - 118481
    Punches                 1 ¼” Circle – 119861, Decorative Label – 120907
    Sizzlits                    Delicate Doilies - 126999
    Accessories           Big Shot - 113439, Snail Adhesive – 104332, Stampin’ Dimensionals – 104430, Pearls – 119247

     
    Click onto the link below so that you can print or save your own instructions


    •  To order Stampin' Up! products online, please Shop Here
    • Want to join my family, and be a part of a group that loves to stamp together, Join Here
    • To check out available classes or to attend any of the classes, please Click Here, click on the "Classes/Workshop" Page or email me vickiawright@bigpond.com
    Until next time, Happy Stampin'

     Vicky

    Sunday, 18 August 2013

    SC 086/13...

    Our challenge over at Sunny Challenges & Creations has been set by me.  Again, she has been very kind to us by only stating that we have to create a " Shaped Card".

    My card this week is what is called a "Twisted Card".  This have been around for some time, but had only sort of ever created half ones & never completed any. 

    If you "Google" "Twisted Card", all sorts of ideas will come up, including tutorials.  I didn't take any tutorial to create mine, but preferring to do it my way.  I turned mine into a Gift Card Holder & added a piece for the writing on the left hand side.

    Over the next week, I hope to have a tutorial for the card, but in the meantime, will give you my supplies for what I used.

    I've decided to enter the card into the challenge over at LNS (Latenight Stampers) to which I belong to.  Their challenge this week is to use "Speciality Paper" on your card.  It isn't really a "Speciality Paper", eg Vellum, but seeing as though I hadn't completed a challenge there in awhile, it would be fun just to enter. 


    Supplies -
    Stamp Set - Flower Shop, Itty Bitty Banners
    Ink - Basic Black, Bermuda Bay
    Cardstock - Basic Black, Very Vanilla
    DSP - Modern Medley
    Punches - Pansy Flower
    Framelits - Bitty Banners
    Accessories - Snail Adhesive, Stampin' Dimensionals, Large Pearls, Tea Lace Paper Doily, Sponge

     
    Be sure to check out what the other Design Team Members & our very talented Guest Designers have created by heading over to Sunny Challenges & Creations.  Create your "Shaped Card", post to your online group, blog, facebook or forum & link back to Mr Linky.
     
    Until next time, Happy Stampin'!
     
    Vicky

    Wednesday, 14 August 2013

    Everything Eleanor....

    ... was the stamp set we used way back in March for one of our Technique Classes - "Heat & Stick".

    As is the case with our Technique Class, we try & create a card that has a different fold.  Our card for this class was the "Box Card".  I love how this turned out & surprise, surprise very easy to create.  I did originally see this card from Valita's Blog.  From memory, I think I sort of adjusted the measurements to suit what I wanted to do.

    Some of the products used to create our card have since been retired, but they can easily be replaced with current products.

    Supplies -
    Stamp Set - Everything Eleanor
    Cardstock - Very Vanilla, Early Expresso, Lucky Limeade (Retired)
    Ink - Calyspo Coral, Lucky Limeade (Retired), Versmark
    DSP - Tea for Two (Retired)
    Ribbon - 3/8" Ruffled - Lucky Limeade (Retired)
    Embossing Folder - Honeycomb
    Punches - Bird Builder
    Accessories - Heat & Stick Powder, Dazzling Diamonds, Stampin' Dimensionals, Sticky Strip, Snail Adhesive, Multipurpose Liquid Glue, Pearls

     
    Bronwen emailed me a photo of one she completed once she went home
     
    • To order Stampin' Up! products online, please Shop Here
    • Want to join my family, and be a part of a group that loves to stamp together, Join Here
    • To check out available classes or to attend any of the classes, please Click Here, click on the "Classes/Workshop" Page or email me vickiawright@bigpond.com
    Until next time, Happy Stampin'
     
    Vicky

    Thursday, 25 July 2013

    Thank You....

    ... to my lovely customers. 

    This is one of the Thank You Cards created for my customers this month.  I've used the gorgeous new "In Colours" to create the cards.  Mind you, they are all in different colours, but will show the remainder in the next couple of days.

    I am really loving the new colours as they are right up my alley, ie being subtle & not too bright.  

    The cards this month are a little smaller than the standard size, in that they are down a size & I am loving this size for small Thank You Cards.  No extra for postage either!

    When I added the Ribbon, I hadn't realised it had retired, so you are able to replace the ribbon with a current one.  The secret is out - Yep, I haven't gone through my "stuff" as yet & sorted out the retired products.  That will have to be done today, so I don't do it again!

    Measurements -
    Base Card - Soft Suede - 5 1/2" x 7" or 14cm x 18cm
    Layer 1 - Crisp Cantaloupe - 5 3/8" x 3 3/8" or 13.5cm x 8.5cm
    Layer 2 - Very Vanilla - 5 1/4" x 3 1/4" or 13cm x 8cm

    Supplies -
    Stamp Set - Field Flowers - 122762, Express Yourself - (Hostess)
    Ink - Baked Brown Sugar - 131174, Crisp Cantaloupe - 131176, Pistachio Pudding - 131177
    Cardstock - Soft Suede - 119982, Crisp Cantaloupe - 131303, Very Vanilla - 106550
    Edgelits - Adorning Accents - 125595
    Embossing Folder - Adorning Accents - 125601
    Ribbon - 1/8" Taffeta Ribbon - Very Vanilla (Retired)
    Accessories - Big Shot - 113439, Snail Adhesive - 104332, Multipurpose Liquid Glue - 110755

    Tutorial -
    1.  Stamp random images onto Very Vanilla Cardstock using Pistachio Pudding Ink for the leaves & Crisp Cantaloupe for the flowers
    2.  Stamp sentiment/greeting in Baked Brown Sugar Ink
    3.  Place Edgelit along bottom of the longer piece of Crisp Cantaloupe Cardstock & run through Big Shot
    4.  Line Embossing Folder with shaped edge from Edglit & run through Big Shot
    5.  Adhere Very Vanilla to top part of Crisp Cantaloupe prior to adhering Ribbon along edge where 2 pieces meet.  Tie bow
    6.  Adhere to Base Card - Soft Suede

    How easy to create a lovely Thank You.  Don't you love the names of the new "In Colours"? 

    • To order Stampin' Up! products online, please Shop Here
    • Want to join my family, and be a part of a group that loves to stamp together, Join Here
    • To check out available classes or to attend any of the classes, please Click Here, click on the "Classes/Workshop" Page or email me vickiawright@bigpond.com
    Until next time, Happy Stampin'
     
    Vicky

    Tuesday, 23 July 2013

    Happy Birthday...

    Our 3rd card from our May Card Class is the post today. 

    Usually in my monthly Newsletter, I include a sketch & a layout for a scrapbook page.  I took the inspiration for the card from one of the newsletter.

    Inside Card -
     
    Card Front -  

    Tutorial to create your own

     
    •  To order Stampin' Up! products online, please Shop Here
    • Want to join my family, and be a part of a group that loves to stamp together, Join Here
    • To check out available classes or to attend any of the classes, please Click Here, click on the "Classes/Workshop" Page or email me vickiawright@bigpond.com
    Until next time, Enjoy!
     
    Vicky

    Saturday, 20 July 2013

    Thank You....

    Today's post is the 2nd card we created in our class in May.  I originally cased the card from Libby but did change it a little, including colours.

    Inside Card -

    Card Front -
     
    Tutorial to create your card


    •  To order Stampin' Up! products online, please Shop Here
    • Want to join my family, and be a part of a group that loves to stamp together, Join Here
    • To check out available classes or to attend any of the classes, please Click Here, click on the "Classes/Workshop" Page or email me vickiawright@bigpond.com
    Until next time, Enjoy
     
    Vicky

    Friday, 19 July 2013

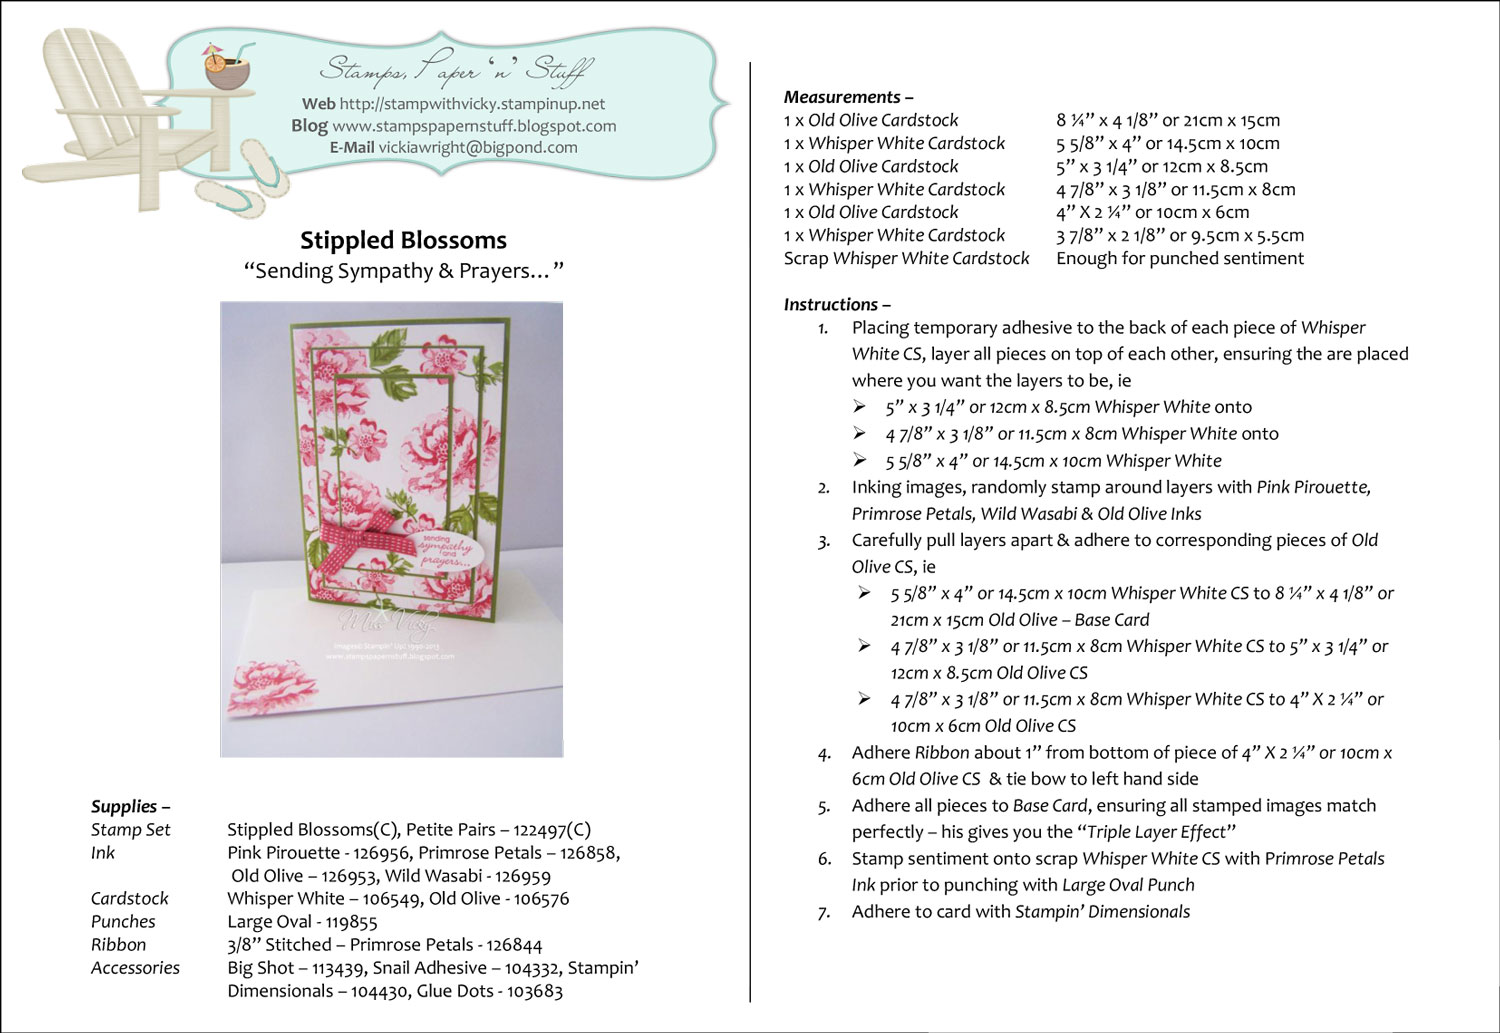
    Sending Sympathy....

    Our card today is a Triple Layer Card we created in Crafty Creations at the Caloundra Community Centre this afternoon.   The ladies loved it, although we did have a few accidents - ink accidents, ie....

    Not only could your imagination go wild thinking of different placements for the front, but they are an easy card to create as well as having a every effective card at the end.

    I don't usually create bright cards, but tend to use the Neutral & Subtle Colour Families.  When doing classes I like to think "outside the square", so to speak which means I tend to take into account what each person likes including colours & styles. It would be a very boring world if we liked all the same, wouldn't it?

    Supplies used to create this card -
    Stamp Set  -  Stippled Blossoms (C) - 126747, Petite Pairs(C) - 122497
    Ink  -  Pink Pirouette - 126956, Primrose Petals - 126858, Old Olive - 126953, Wild Wasabi - 126959
    Cardstock  -  Whisper White - 106549, Old Olive - 106576
    Punches  -  Large Oval - 119855
    Ribbon  -  3/8" Stitched - Primrose Petals - 126844
    Accessories  -  Big Shot - 113439, Snail Adhesive - 104332, Stampin' Dimensionals - 104430, Glue Dots - 103683
     
     
    Don't forget to click on the link below so that you can print & save the instructions to create your own Triple Layer Card


    •   To order Stampin' Up! products online, please Shop Here
    • Want to join my family, and be a part of a group that loves to stamp together, Join Here
    • To check out available classes or to attend any of the classes, please Click Here, click on the "Classes/Workshop" Page or email me vickiawright@bigpond.com
    Until next time, Happy Stampin'
     
    Vicky

    Thursday, 18 July 2013

    Birthday Wishes....

    I've been a huge fan of Silke Leglow way before I started Stampin' Up!  I love her clean crisp cards.

    Today's post is one of the cards we did in a class way back in May but of course I changed it to suit Stampin' Up! products.  Thank you so much Silke for your inspiration!

    Inside Card -
     
    Card Front -
     
    Tutorial for you create your own card


    •  To order Stampin' Up! products online, please Shop Here
    • Want to join my family, and be a part of a group that loves to stamp together, Join Here
    • To check out available classes or to attend any of the classes, please Click Here, click on the "Classes/Workshop" Page or email me vickiawright@bigpond.com
    Until next time, Enjoy
     
    Vicky
     

    Monday, 15 July 2013

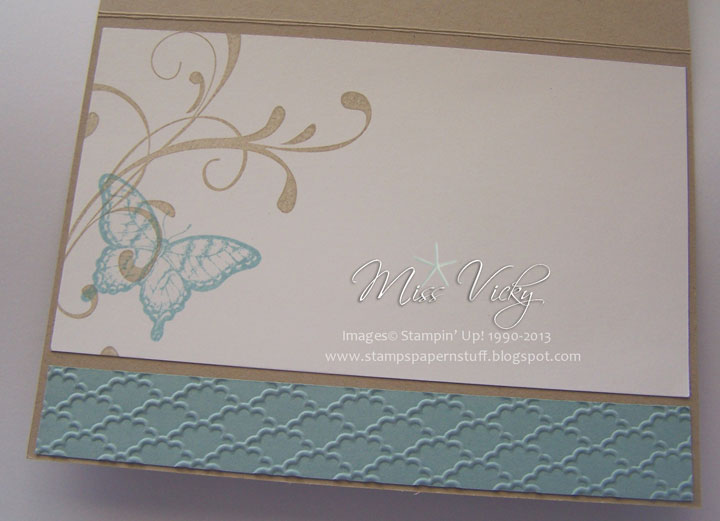
    Feel Better Soon...

    I found out that one of my ladies & friend who comes to our Technique Class spent some of the school holidays in hospital.  I created this one especially for her. 

    In fact I've add the "Swallowtail" Stamp sitting on the shelf for some time, but just couldn't get an idea in my head to use it.  I have seen some lovely work using this stamp, but I don't usually use a stamp until an idea pops into my head. 

    Determined to use the stamp & not really knowing what I was going to do, I grabbed the stamp, a couple of colours & played.  I'm happy with the result.  It is a very simple, easy card, but effective at the same time.

    Thanks Bronwen for getting me to use this lovely stamp & hope you are feeling much, much better.

    Supplies -
    Stamp Set - Swallowtail – 129216, Express Yourself - 130339
    Ink - Pool Party – 126982, So Saffron – 126957, Soft Suede - 126978
    Cardstock - Whisper White – 106549, Pool Party – 124391, So Saffron – 108611
    Embossing Folder - Perfect Polka Dots - 117335
    Punches - Word Window – 119857, Modern Label – 119849
    Bigz - Top Note - 113463
    Accessories -  Big Shot - 113439, Snail Adhesive – 104332, Stampin’ Dimensional - 104430

     
    Click on the link below to create your card
     
     
    •   To order Stampin' Up! products online, please Shop Here
    • Want to join my family, and be a part of a group that loves to stamp together, Join Here
    • To check out available classes or to attend any of the classes, please Click Here, click on the "Classes/Workshop" Page or email me vickiawright@bigpond.com
    Until next time, Happy Stampin'
     
    Vicky

    LinkWithin

    Related Posts Plugin for WordPress, Blogger...