Showing posts with label Stampin' Up. Show all posts

Sunday, 20 April 2014

Especially for You...

It seems like forever since my last post, but with the wedding season upon us, invitations & receptions have been taking up all my spare time.
 
Today's post is one I created a couple of weeks go & thought I would share with you.  It is a very easy layout but one that can be changed out to whatever you want using different stamps, colours & even DSP.
 
In fact, this card would make a perfect card for Mum, especially with Mother's Day just around the corner.
 
Measurements -
Base Card - Perfect Plum - 8 1/4" x 5 7/8" or 21cm x 10.5cm
Layer 1 - Sahara Sand - 5 3/4" x 4" or 14.5cm x 10cm
Layer 2 - Pink Pirouette - 5 5/8" x 3 7/8" or 14cm x 9.5cm
Layer 3 - 2 x Perfect Plum - 1/2" x 3 7/8" or 2cm x 9.5cm
Layer 4 - Very Vanilla - 1" x 3 7/8" or 2.5cm x 9.5cm
 
Supplies -
Stamp Set - Stippled Blossoms, Made for You
Ink - Perfect Plum, Pink Pirouette, Wild Wasabi, Pear Pizzazz
Cardstock - Pink Pirouette, Very Vanilla, Perfect Plum, Sahara Sand
Embossing Folder - Perfect Polka Dots
Punches - Dotted Scallop Ribbon Border
Accessories - Simply Scoring Tool, Stampin' Dimensionals, Snail Adhesive
 
Tutorial -
1.  Emboss bottom part of Pink Pirouette CS with Perfect Polka Dots EF
2.  Randomly score top part of CS using Simply Scoring Tool
3.  Punch 2 pieces of  Perfect Plum CS with Dotted Scallop Ribbon Border
4.  Stamp greeting/sentiment onto Very Vanilla CS with Perfect Plum Ink
5.  Adhere punched Perfect Plum pieces to bottom & top of Very Vanilla CS
6.  Cut 3 banners from scrap Sahara Sand & Perfect Plum CS prior to adhering to centre piece
7.  Adhere whole piece to embossed Pink Pirouette CS just above halfway
8.  Stamp Flower & Leaves onto scrap Very Vanilla CS using Pink Pirouette & Perfect Plum for rose & Wild Wasabi & Pear Pizzazz for leaves
9.  Cut out & adhere to card with Stampin' Dimensionals
 

  •  To order Stampin' Up! products online, please Shop Here
  • Want to join my family, and be a part of a group that loves to stamp together, Join Here
  • To check out available classes or to attend any of the classes, please Click Here, click on the "Classes/Workshop" Page or email me vickiawright@bigpond.com
Until next time, Happy Stampin'
 
Vicky

Thursday, 17 April 2014

April Monthly Kits


"Stippled Blossoms"
is our Stamp Set for April & just in time for Mother's Day!
 
To purchase your kit, all you have to do is click on Stamp of the Month Kits at the top of the page.  It will take you straight to the page where you will see the PayPal Drop Down Button.
 
Once payment has been received, your kits (Australia only) will be posted in the mail.  You will receive your PDF Tutorial (available to anyone) via email.
 
 
Until next time, happy stampin'
 
Vicky

Thursday, 23 January 2014

Having a Play...

... with the Circle Card Thinlits.  I've had them for some time, but was playing around the other day & decided to give them a bit of a workout!
 
If you haven't purchased these Thinlits, do so, as you will have so much fun doing so.  In fact, this is going to be a card for one of my Birthday next month.
 
Card Open -
 
Card Front -
 
It is a little different to my usual cards, so I would love to know what you think?
 
I will try & write a basic Tutorial for this card in the next couple of days & post for you. 
  •  To order Stampin' Up! products online, please Shop Here
  • Want to join my team and be a part of a group that loves to stamp together, Join Here
  • To check out available classes or to attend any of the classes, please Click Here, click on the "Classes/Workshop" Page or email me vickiawright@bigpond.com
Until next time, Happy Stampin'
  
 Vicky

Saturday, 30 November 2013

Craft Project Central SC 29

For my card today, I liked the sketch from Craft Project Central - Creating Pretty Cards.  I've been following these sketches for some time but have never participated in them.  So today, I decided to do that!

Not only do they supply you with a mini tutorial on the sketch, along with measurements, but wait there's more!  By playing along with this challenge, you get a chance to win a free month's subscription of your choice to all their wonderful projects. 

Mind you, my card is nothing like I had in my head.  In fact it was going to be a Birthday Card, but I had all the papers, etc out on the desk & then just went along with the sketch.


Measurements -
Base Card - Midnight Muse - 8 1/4" x 5 7/8" or 21cm x 15cm
Layer 1 - Whisper White - 5 5/8" x 4" or 14.5cm x 9cm
Layer 2 - DSP - 5 1/2" x 3 3/4" or 14cm x 9.5cm
Layer 3 - Midnight Muse - 5" x 3 1/4" or 13cm x 8.5cm
Layer 4 - Whisper White - 4 7/8" x 3 3/8" or 12.5cm x 8cm
Layer 5 - DSP - 1" x 34 7/8" or 2.5cm x 8cm
Layer 6 - Midnight Muse - 2 1/8" x 3/4" or 5.5cm x 2cm
Layer 7 - Whisper White - 2" x 5/8" or 5cm x 1.5cm

Supplies -
Stamp Set - Special Season
Ink - Pool Party
Cardstock - Midnight Muse, Whisper White
MDS - "Merry Christmas"
DSP - Winter Frost Speciality
Ribbon - 1/8" Silver
Accessories - Snail Adhesive, Dazzling Details - Silver, Glue Dots

 
Tutorial -
1.  Adhere Whisper White - 5 5/8" x 4" or 14.5cm x 9cm to Base Card - Midnight Muse
2.  Adhere DSP - 5 1/2" x 3 3/4" or 14cm x 9.5cm to top of Whisper White
3.  Stamp tree image onto LHS (Left Hand Side) Whisper White - 4 7/8" x 3 3/8" or 12.5cm x 8cm in Pool Party Ink
3.  Adhere DSP - 1" x 34 7/8" or 2.5cm x 8cm to RHS of Whisper White - 4 7/8" x 3 3/8" or 12.5cm x 8cm
5.  Adhere Ribbon down side
6.  Adhere to Midnight Muse - 5" x 3 1/4" or 13cm x 8.5cm prior to adhering to Base Card
7.  Create "Merry Christmas" in MDS
8.  Adhere to Midnight Muse - 2 1/8" x 3/4" or 5.5cm x 2cm
9.  Tie small bow with Silver Ribbon & adhere to Card with Glue Dot
10.  Randomly apply Dazzling Details to tree

 
If you want to enter, be sure to head over to Craft Project Central as there is only 1 1/2 days left to enter.
 
Until next time, Happy Stampin'
 
Vicky

Friday, 15 November 2013

Something Just for You....

No, not a card today, but a Post-It Notes I was asked to create for a lovely lady.  In fact it was the lady who purchased one of my calendars & asked if I would mind creating Post-It Notes for her.  They were going to be a Christmas Present for a work friend.  You can see the calendar from Wednesday
 
It is not often I will create duplicates of anything, but I think I will be doing this again.  I love it!
 
Supplies -
Stamp Set -  Label Something
Ink - Basic Black
Cardstock - Basic Black, Very Vanilla
DSP - Modern Medley
Ribbon - 1/8" Taffeta - Basic Black
Punches - Hexagon, Decorative Label
Embossing Folder - Stripes
Accessories - Stampin' Dimensionals, Snail Adhesive, Sticky Strip
 

  •  To order Stampin' Up! products online, please Shop Here
  • Want to join my family, and be a part of a group that loves to stamp together, Join Here
  • To check out available classes or to attend any of the classes, please Click Here, click on the "Classes/Workshop" Page or email me vickiawright@bigpond.com
Until next time, Happy Stampin'
 
Vicky 


Wednesday, 13 November 2013

2014...

... is fast approaching & with the new year comes the thoughts of new calendars.  Today's share is just that - a 2014 calendar!!!!!
 
I originally created a couple of calendars for the Handmade Expo 2 weeks ago just to see how the reaction would be & to see if people would actually be interested.  Much to my surprise, they flew off the table.
 
To print & create your own calendar, just click on the "Yearly Calendar" Page
 
I don't have a tutorial for you today, as they were a last minute thought.  Thinking that they would not sell, I had all intentions of doing a Tutorial once I got home.  However, in saying that, I will have one up & running in the next couple of weeks for you.
 
Supplies -
Stamp Set - Everything Eleanor
Ink - Basic Black, Basic Grey
Cardstock - Basic Black, Very Vanilla
DSP - Modern Medley
Framelits - Apothecary Accents
Accessories - Stampin' Dimensionals, Snail Adhesive, Pearl Jewels, Glimmer Brads - Neutrals


  •  To order Stampin' Up! products online, please Shop Here
  • Want to join my family, and be a part of a group that loves to stamp together, Join Here
  • To check out available classes or to attend any of the classes, please Click Here, click on the "Classes/Workshop" Page or email me vickiawright@bigpond.com
Until next time, Happy Stampin'
 
Vicky

Sunday, 10 November 2013

SC 092/13...

Crikey these weeks come round fast.  It just seems like yesterday that we had our last challenge, but looking at my last post, I haven't posted much in the last couple of weeks.  Hopefully, that will be fixed this week.

It was my turn to do the challenge over at Sunny Challenges & thought it would be great if we had a Colour Theme.  "Pool Party"  seems to be the in-colour for Christmas this year, so this should be an easy colour for everyone to join in the fun.

Unfortunately, I don't have any measurements for my card this week.  I sold it last Sunday at the Handmade Expo.  I had completely forgotten that I had created it for this challenge & only took a photo at the last moment, else I would have had to create another card.

Supplies -
Stamp Set - Ornament Keepsakes, Teeny Tiny Sentiments
Ink - Island Indigo, Pool Party
Cardstock - Whisper White, Island Indigo, Pool Party, Smokey Slate
Embossing Folders - Pretty Print, Stylish Stripes
Framelits - Ornament Keepsakes
Punches - 2 1/2" Circle, Word Window, Modern Label
Ribbon - 1/8" Silver
Accessories - Rhinestone Jewels, Stampin' Dimensionals, Snail Adhesive

I run the piece of Island Indigo CS through the BS using Stylish Stripes EF.  This is fast becoming one of my favourite folders.  The piece of Pool Party CS was again put through the BS, this time using Pretty Print EF.  I then ran a piece of the Silver Ribbon across the middle of the joins & tied a bow.  I adhered both these embossed pieces to a piece of Whisper White CS prior to adhering to Base Card - Smokey Slate.


I stamped 3 different size snowflake images onto Whisper White CS - 1 x Island Indigo, 1 x Pool Party & a smaller one again in Island Indigo. The 2 largest were then run through the BS using the matching Framelits prior to layering on top of each other with Stampin' Dimensionals.  I cut out the middle of the small snowflake & adhered to the centre.

I punched a circle from Whisper White CS with the 2 1/2" Circle Punch, adhered to Base Card prior to adhering the snowflakes to the centre with Stampin' Dimensionals.

The greeting was stamped onto Whisper White CS in Pool Party Ink, punched with the Word Label Punch & adhere to a piece of Island Indigo which had been punched with the Modern Label Punch.  It was then adhered to the Base Card with Stampin' Dimensionals.

To finish the card, I placed a small Rhinestone Jewel in the centre, as well as either side of the sentiment.


To see what Kris has created, head on over to Sunny Challenges & check it out.  Why not join us for this fun challenge.  We love seeing your wonderful work & leaving comments on your blog.
  •  To order Stampin' Up! products online, please Shop Here
  • Want to join my family, and be a part of a group that loves to stamp together, Join Here
  • To check out available classes or to attend any of the classes, please Click Here, click on the "Classes/Workshop" Page or email me vickiawright@bigpond.com
Until next time, Happy Stampin'
 
Vicky

Friday, 1 November 2013

Pre-Cut Kits...

"Festive Flurry"
is our stamp set for the month of November.

Along with this gorgeous stamp set, I've gone with the gorgeous DSP - Winter Frost Speciality Papers from the Seasonal Catalogue.  All 4 cards have a different Embossing Folder which gives them all their own look while at the same time using the same supplies.

 To purchase your kit, all you have to do is click on Stamp of the Month Kits at the top of the page.  It will take you straight to the page where you will see the PayPal Drop Down Button.
 
Once payment has been received, your kits (Australia only) will be posted in the mail.  You will receive your PDF Tutorial (available to anyone) via email.
 
 
  •  To order Stampin' Up! products online, please Shop Here
  • Want to join my family, and be a part of a group that loves to stamp together, Join Here
  • To check out available classes or to attend any of the classes, please Click Here, click on the "Classes/Workshop" Page or email me vickiawright@bigpond.com
Until next time, Happy Stampin'
 
Vicky

Sunday, 27 October 2013

SC 091/13...

For our challenges over at Sunny Challenges & Creations we have a simple sketch.  Sometimes, the simple challenges really challenge me & I have a hard time creating something.

I have not long received the cute little stamp set - Kind & Cozy & matching DSP - Gingham Garden, so I thought I would dig it out & ink it up before it become one of those sets that I love but never sees ink for a couple of months.

In keeping with the sketch, I kept my card very simple.  In fact, this card went off in the post during the week.

Inside -

 
Front -
 
We would love for you to play along with us this week.  You have 2 weeks to complete your creation.  All you have to do is head on over Sunny Challenges & Creations & check out what the other members of the Design Team & our Guest Designers have created. 
 
Tutorial to create your card.  Click on the link below to print


  •  To order Stampin' Up! products online, please Shop Here
  • Want to join my family, and be a part of a group that loves to stamp together, Join Here
  • To check out available classes or to attend any of the classes, please Click Here, click on the "Classes/Workshop" Page or email me vickiawright@bigpond.com

  • Until next time, Happy Stampin'
     
    Vicky

    Wednesday, 16 October 2013

    SC 090/13...

    Our current challenge over at Sunny Challenges & Creations is to create something using the fantastic "Framelits" from Stampin' Up!

    I decided to create a Christmas Card for this challenge.  I am in the process of creating these cards for my next market coming up first Sunday in November, so this was the perfect opportunity for me.

    Truth be told, I didn't really know where I was going with this card, but knew that I wanted to use the "Ornament Keepsakes" with the dotty DSP from "Season of Style" which is in the current "Holiday Catalogue".  Of course I had to used my favourite EF - Perfect Polka Dots!

    Supplies –
    Stamp Set              Ornament Keepsakes – 128051, Petite Pairs - 122497
    Ink                             Old Olive – 126953, Chocolate Chip – 126979,
    Cherry Cobbler – 126966
    Cardstock              Whisper White – 106549, Old Olive – 106576, Chocolate Chip – 108599, Cherry Cobbler - 121681
    DSP                           Season of Style - 132340
    Embossing Folder Perfect Polka Dots - 117335
    Framelits               Holiday Ornaments – 127816, Adorning Accents - 125595
    Punches                 Large Oval – 119855, Scallop Oval – 119856, 1” Circle - 119868
    Baker’s Twine      Cherry Cobbler - 123125
    Accessories          Snail Adhesive – 104332, Stampin’ Dimensionals – 104430, Pearls – 119247, Glue Dots - 103683


    Don't forget to head over to Sunny Challenges & Creations to check out what the other members of the Design Team have created.  We would really love for you to join us this in this challenge.  You have 2 weeks to create your project & link back with Mr Linky.

    Click on the link below to get your Tutorial to create your own card
     

  •  To order Stampin' Up! products online, please Shop Here
  • Want to join my family, and be a part of a group that loves to stamp together, Join Here
  • To check out available classes or to attend any of the classes, please Click Here, click on the "Classes/Workshop" Page or email me vickiawright@bigpond.com

  • Until next time, Happy Stampin'
     
    Vicky

    Wednesday, 9 October 2013

    Technique Class # 2....

    Today's post is the 2nd card we created for our "Sunburst" Technique class.  You can see the 1st card one post back.

    I wanted to try a little something different when I was thinking about the 2nd card.  At first I wasn't too keen on the colours but hey with classes I find that it is best to try & step out of your comfort zone.  I try to create cards that will suit different people in the class & not just what I like.  The ladies love it, especially when they realise that I have used their favourite colours!!!!!

    Supplies -
    Stamp Set - Flower Shop - 130942
    Cardstock - Very Vanilla - 106550, Island Indigo - 124390, Pistachio Pudding - 130020, Soft Suede - 119982
    Ink - Crisp Cantaloupe - 131176
    DSP - Venetian Romance - 130144
    Embossing Folders - Perfect Polka Dots - 117335
    Punches - Pansy - 130698
    Framelits - Ovals Collections - 129381
    Embosslits - Beautiful Wings - 118138
    Sizzlits - Little Leaves - 114511
    Accessories - Big Shot - 113439, simply Scoring Tool - 122334, Trimmer - 129722, Snail Adhesive - 104332, Stampin' Dimensionals - 104430, Multipurpose Glue - 110755, Basic Pearls - 119247, Large Pearls - 125577


    "Sunburst" Technique
    •  To order Stampin' Up! products online, please Shop Here
    • Want to join my family, and be a part of a group that loves to stamp together, Join Here
    • To check out available classes or to attend any of the classes, please Click Here, click on the "Classes/Workshop" Page or email me vickiawright@bigpond.com
    Until next time, Happy Stampin'
     
    Vicky

    Monday, 7 October 2013

    Technique Class....

    A couple of weeks ago we had fun learning & playing with the "Sunburst" Technique.  If you haven't played with this, do yourself a favour & do so.

    The best part about this technique, we all started out with the same kit BUT all ended up with different results!

    I actually cased the card on Page 110 of the Catalogue.  I did swap a couple of things from the original card.  Gotta admit, this is fantastic when you hit a blank wall.  We also played with the Clay & Molds in this class & were a huge hit with everyone!

    Supplies -
    Stamp Set - For You - 130538
    Cardstock - Whisper White - 106549, Smokey Slate - 131291, Coastal Cabana - 130024
    Ink - Crushed Curry - 131173, Smokey Slate - 131179
    DSP - Eastern Elegance - 130131
    Embossing Folders - Perfect Polka Dots - 130131
    Punches - Scallop Edge Border - 119882
    Accessories - Big Shot - 113439, Simply Scoring Tool - 122334, Snail Adhesive - 104332, Simply Pressed Clay - 130685, Buttons & Blossoms Clay Molds - 131272, Aqua Painter - 103954


    Pop back in a couple of days & I will show you our 2nd card we created in this class. 
    •  To order Stampin' Up! products online, please Shop Here
    • Want to join my family, and be a part of a group that loves to stamp together, Join Here
    • To check out available classes or to attend any of the classes, please Click Here, click on the "Classes/Workshop" Page or email me vickiawright@bigpond.com
    Until next time, Happy Stampin'
     
    Vicky 

    Saturday, 5 October 2013

    Gift Card Holder...

    One of our cards we created in Crafty Creations a couple of weeks ago was a Christmas Card  Gift Holder.  I did find this on Google which led me back to Kay Kalthoff.  Those that know me I am not one to watch videos or follow instructions.  I sort of sit down & work things out for myself.  I did watch a bit of this video, but then went off on my own & ended up with this result!

    Me being me, I did change it a little, including the papers & the design a little.  The class loved it!

    Supplies –
    Stamp Set - MDS – 132849 – No Peeking Stamp Brush Set
    Cardstock - Very Vanilla – 106550, Riding Hood Red – Retired, Old Olive - 106576
    DSP - Jolly Holiday - Retired
    Punches - Dotted Scallop Ribbon Border – 119275,  Large Scallop Oval - 119855
    Accessories - Snail Adhesive – 104332, Stampin’ Dimensionals - 104430

    Front -

    Inside -

     Tutorial to create your own
     
    •  To order Stampin' Up! products online, please Shop Here
    • Want to join my family, and be a part of a group that loves to stamp together, Join Here
    • To check out available classes or to attend any of the classes, please Click Here, click on the "Classes/Workshop" Page or email me vickiawright@bigpond.com
    Until next time, Happy Stampin'


     Vicky

    Thursday, 3 October 2013

    Christmas Card # 2....

    Today is the 2nd card one of the groups in my class of 20 a couple of weeks ago did.  You can view the first card one of the groups completed.  They were all very easy cards, but this time we concentrated on the Big Shot & learning out to emboss.  I especially love that I can use some of my favourite retire stamps & retired DSP.

    I originally found this on Google sometime ago.  I did go searching for it to give credit but now I can't find it.  Please let me know if you recognise it as I would love to give you credit.  Thank you so much for the inspiration!

     
    I have since sold this card so today there is no tutorial.
     
    Until next time, Happy Stampin"
     
    Vicky

    Wednesday, 2 October 2013

    Pre-Cut Kits....

    Our stamp set this month is the great Christmas set which has been carried over -
    "Ornament Keepsakes"

    With Christmas just around the corner, this is the prefect chance to make an early start on those cards in time for posting in December.
     
    This month, we have showcased the gorgeous new DSP - Season of Style - which is in the Seasonal Catalogue.  The kit is very tradition Christmas colours.  The new Embossing Folder - Stylish Stripes is also showcased in this set of cards.  In fact one of the cards has a small surprise inside, but shhhhhhhhhhhh if I tell you what it is then it won't be a surprise!

     To purchase your kit, all you have to do is click on Stamp of the Month Kits at the top of the page.  It will take you straight to the page where you will see the PayPal Drop Down Button.
     
    Once payment has been received, your kits will be posted in the mail.  You will receive your PDF Tutorial via email.
     
     
    •  To order Stampin' Up! products online, please Shop Here
    • Want to join my family, and be a part of a group that loves to stamp together, Join Here
    • To check out available classes or to attend any of the classes, please Click Here, click on the "Classes/Workshop" Page or email me vickiawright@bigpond.com
    Until next time, Happy Stampin'
     
    Vicky

    Monday, 30 September 2013

    SC 089/13...

    It was my turn to set the challenge this week at Sunny Challenges & Creations.  I went with the theme of "BABY".

    This could be anything from cards, 3-D Projects or even a Scrapbook page.  In fact I very nearly did a page, but my mind went blank at the last moment.  I even had a hard time creating my card for the challenge.  Do you ever get something in your mind, knowing that it is all wrong, but not knowing where to go?  This happened to me. 


    Once I had finished my card, I suddenly realised that I had created the whole card on top of my catalogue which was opened at the page the stamp set appeared on.  I am just lucky that I didn't get glue, etc all over the page......

    My card is a little different as I don't really have any "baby" stamps, except for my wheel.  As bicycles seem to be popular at the Handmade Expo I attend, I thought it perfect timing to catch up on  my baby cards.

    For the inside of my card, I cut a piece of Whisper White Cardstock back to 5 1/2" x 3 3/4" or 14cm x 9.5cm & adhered to the inside Base Card.  I cut an upside down "V" into a 3/4" x 5 1/2" or 2cm x 14cm piece of DSP  to form a pennant shape & adhered to top of Whisper White Card.


    Supplies -
    Stamp Set - Timeless Talk - 126607, Teeny Tiny Sentiments - 120024
    Ink - Rose Red - 126954
    Cardstock - Whisper White - 106549, Pink Pirouette - 116203, Rose Red - 108613
    DSP - Paper Stacks - Regals - 130139
    Embossing Folder - Perfect Polka Dots - 117335
    Punches - 1/4" Stitched Grosgrain - Whisper White - 126877
    Accessories - Snail Adhesive - 104332, Stampin' Dimensionals - 104430, Basic Rhinestones - 119246

     
    Tutorial for you to create your own card
     
     
    Don't forget to pop on over to Sunny Challenges & Creations & check out what the other girls have created.  We always love seeing your creations. 
    •  To order Stampin' Up! products online, please Shop Here
    • Want to join my family, and be a part of a group that loves to stamp together, Join Here
    • To check out available classes or to attend any of the classes, please Click Here, click on the "Classes/Workshop" Page or email me vickiawright@bigpond.com
    Until next time, Happy Stampin'
     
    Vicky

    Saturday, 28 September 2013

    Chalkboard Technique....

    ...was the technique we completed in our Technique Class 2 weeks ago.  This technique seems to be all the rage at the moment, but mind you it is lots of fun!

    Supplies -
    Stamp Set - Sketched Birthday - 130426
    Cardstock - Whisper White - 106549, Basic Black - 121688, Soft sky - 131292, Early Expresso - 121686
    Ink - Versamark - 102283, Whisper White Craft - 101731, Crushed Curry - 131173
    Punches - Petite Pennants Builder - 122361
    Framelits - Bitty banners - 129267
    Embossing Folders - Alphabet Press - 130916
    Accessories - Big Shot - 113439, Snail Adhesive - 104332, Stampin' Dimensionals - 104430, Heat Tool - 129056, Embossing Powder - White - 109132
     

    Want to learn how to do this fun technique?
     
    Contact me to book your workshop or class today!
     
    Until next time, Happy Stampin'
     
    Vicky

    Thursday, 26 September 2013

    Technique Class....

    As usual I am a little behind in posting one of the cards we did in our Technique Class a couple of weeks ago.  We focused on "Double Embossing"  If you haven't played with this technique, make sure you do, as it is a lot of fun & so many possibilities. In this class we concentrated on 2 of the may possibilities.

    Today's cards is the more traditional way of "Double Embossing".  We also concentrated on Father's Day.  For those who didn't want to create a card for Father's Day, they use "Birthday Wishes" instead.

    To create my card I combined a couple of different cards together from Pinterest.

    Card -
     
    Our Bonus Project was a Wine Label to match the card 
     
    I then created a Post-It Note Holder when I got home
     
    This is the set together, including a matching Gift Card 
     
    Until next time, when I will show you the 2nd card we created
     
    Happy Stampin'
     
    Vicky

    Tuesday, 24 September 2013

    Christmas Card #1...

    Last week I had the privilege of having a class with 20 or so ladies.  I usually do this class one every year where we create Birthday Cards.  They then give out the same cards throughout the year when their birthdays come around.  For something a little different, we decided to create Christmas Cards & concentrate on embossing, which was a huge hit! 

    Doing a class this size can be quiet exhausting & utter chaos, but I think we have it down to a fine art now whereby we are in about 5/6 small groups.  Each group has their own supplies, including inks, stamps, kits, etc while at the same time creating 5/6 different cards.

    In fact, this time round I had a table where I left the Punches to be used, Big Shot & about 4 different Embossing Folders.  It worked brilliantly!

    Mind you it does take me some time to think up some easy designs & cards, but at the same time, ensuring that the ladies will love them & get to use different supplies.  It also gave me a chance to use up some of my retired stock.

    As with these classes everyone's card always turns out very different, which is great!

    Supplies -
    Stamp Set - Lovey as a Tree - 127793, Teeny Tiny Sentiments - 120024
    Ink - Certainly Celery - Retired, Chocolate Chip - 126979
    Cardstock - Very Vanilla - 106550, Baja Blue - Retired, Certainly Celery - Retired
    Punches - Modern Label - 119849, Word Window - 119857
    Embossing Folder - Petals a Plenty - Retired
    Ribbon - 1/2" Seam Binding - Baja Breeze - Retired
    Accessories - Stampin' Dimensionals, 104430, Anywhere Glue Stick - 104045, Multipurpose Liquid Glue - 110755

     
    Instructions to create your own card
     
    •  To order Stampin' Up! products online, please Shop Here
    • Want to join my family, and be a part of a group that loves to stamp together, Join Here
    • To check out available classes or to attend any of the classes, please Click Here, click on the "Classes/Workshop" Page or email me vickiawright@bigpond.com
    Until next time, Happy Stampin'
     
    Vicky

    Sunday, 22 September 2013

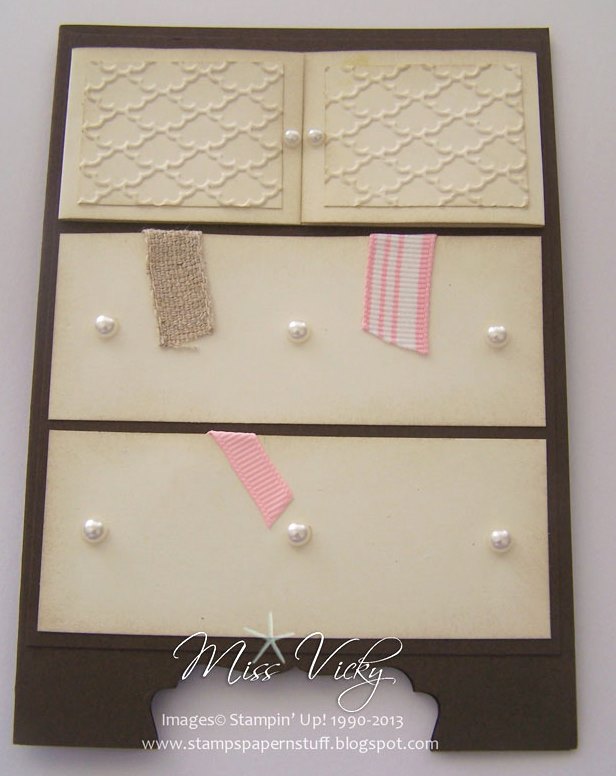
    Cupboard....

    ... Stampin' Up! style.
     
    This is another card I cased from Pinterest.  Thank you Michelle for your inspiration.  The ladies at Crafty Creations loved it!  Mind you it is now quiet some time we created it!

    This card makes for heaps of possibilities with some of the ladies creating the card aimed at babies, kids & in general.  It would perfect for the teenager too!
      
    Supplies –
    Stamp Set            Happiest Birthday Wishes (Retired)
    Ink                           Pretty in Pink (Retired), Crumb Cake - 126975
    Cardstock             Very Vanilla - 106550, Chocolate Chip - 108599
    Ribbon                   Natural Trim – 129287, Pretty in Pink (Retired)
    Embossing Folder Fancy Fan – 127751
    Punches                 Decorative Label - 120907
    Accessories           Big Shot - 113439, Snail Adhesive – 104332, SU Sponge - 101610, Pearls - 119247

    Front - 
     
     Cupboards Closed - 


    Tutorial to create your Cupboard
     
    •  To order Stampin' Up! products online, please Shop Here
    • Want to join my family, and be a part of a group that loves to stamp together, Join Here
    • To check out available classes or to attend any of the classes, please Click Here, click on the "Classes/Workshop" Page or email me vickiawright@bigpond.com
    Until next time, Happy Stampin'

     Vicky

    LinkWithin

    Related Posts Plugin for WordPress, Blogger...